How to set up a Home Recording Studio – The 12 Essential Steps
When inspiration strikes, nothing beats having a home recording studio at the ready.
With your own recording studio you can make top quality recordings at a fraction of the price of a commercial studio.

Welcome to my site. I’m Daren Banarsë, a TV and stage composer, working from my own home recording studio. I’m also a former lecturer on the music degree course at Goldsmiths College, University of London.
I know how frustrating it can be to get started with home recording, and choosing the equipment necessary to get pro audio quality for film, TV, or commercial recordings. My studio has evolved over the years, and I’ve moved from working in big commercial studios, to using a very simple set up at home.
I use my studio for so many things – creating music, recording voiceovers, making soundtracks for TV and recording my melodica YouTube videos. You might have heard my music on the Apprentice, Top Gear or Newsnight
These opportunities are now open to everyone.
But it can be difficult to know where to start with the array of equipment choices out there. There’s also some important considerations that often get overlooked.
In this article I’m going to break down everything you need for your own home studio, so you can get started right away.
Topics covered:
1. Choosing a Computer
2. DAW Software
3. Audio Interface
4. Microphones
5. Studio Monitors
6. Studio headphones
7. MIDI Controller Keyboards
8. Soundproofing
9. Acoustic treatment
10. Stands and cables
11. Studio set up
12. Mindset
Let’s get started…
1. Choosing a Computer
The computer is the heart of the home studio.
If you’re starting out, and already have a computer, I recommend using whatever you already have. PCs and Macs are both fine, so stick with the operating system you’re comfortable with.
Buying a computer
If you’re buying a new computer, there’s a few things to consider…
You’ll need a fast, powerful machine. The computer needs to work with several large audio files at the same time, and without enough power, it’s at risk of constantly stuttering and stopping.
This is the great killer of creative flow.
Specs for a music computer
In terms of specifications, aim for at least 16gb of ram and the fastest CPU you can afford. You could get away with less than this, but with ever-expanding file sizes, its better to future proof your investment.
You don’t want to have to trade it in for a more powerful model next year.
The same goes for the internal hard drive – make sure it’s fast enough. SSD is better than HDD, and no less than 500gb in size. Many musicians opt to buy another external hard drive, just for audio files.
Also consider how noisy the fan is. Too much noise makes it impossible to make decent recordings, or even hear what you’re mixing properly.
Can you produce music on a laptop?
These days laptops are powerful enough to be the centre of most home recording studios.
I love taking my laptop to a cafe or shared workspace, to write, edit or even mix music. Of course I need headphones for this (more below).
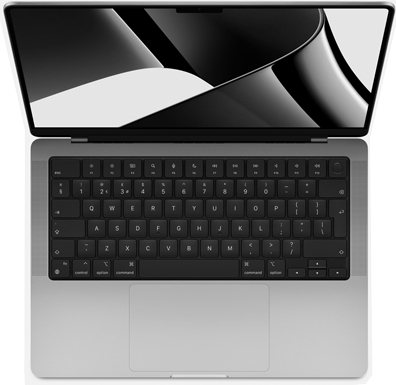
I bought a 14″ Macbook Pro M3 for my own recording studio in 2023. I went for a higher spec than I need right now, as I do video editing too, and wanted to future proof for years to come. I chose 36Gb of ram, and upgraded to a 2TB SSD drive. A good budget alternative would be the Mac Mini.
If I was going the PC route, I’d be tempted to make a saving by building my own desktop machine. Though more likely, I’d go for a ready made laptop, like the Del XPS or Samsung Notebook 9.
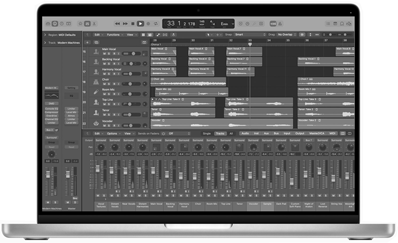
2. DAW Software
This is the powerful software for your computer. It gives you access to a virtual recording studio, and a vast collection of instruments.
DAW means Digital Audio Workstation
Use your DAW to build up a full song, one track at a time. Or record a whole band in a live take.
If you’re a solo songwriter, start with programming a drum rhythm. Then add a bass line. You’ll then be able to try out different virtual instruments, and record some acoustic guitar.
Once you’ve put down the vocals, you can gear them in a selection of virtual rooms and see which one suits the best.
All the tools of a professional recording studio are available for tweaking the sound with compression and eq.
Choosing the right DAW
There’s several choices of DAW software for your home recording studio. They all do the same thing, but each have their own workflow. Some are more suitable for specific genres of music.
For loop based electronic music, take a look at Ableton Live.
Ableton was originally developed for DJs and musicians who performed live, and has now grown into a powerful DAW. FL Studio is also good for electronic music, and it’s simple and affordable.
I use Logic Pro, which is only available on Macs. It’s super powerful and comes with a vast collection of instruments and effects. It’s popular with composers, and anyone writing for film, TV and video games.
A very basic version of Logic Pro, called Garageband comes free with all Macs, and can be a great introduction.
Turning pro
If you aim to graduate from a home studio to a commercial studio, take a look at Pro Tools. It’s still the industry standard for professional recording, and used to record the majority of studio albums in the charts.
3. Audio Interface
This is a little box, which you attach to your computer with a USB or thunderbolt cable. Though it could connect through a firewire port if you have an older computer.
Use this box to connect microphones, keyboards or any instruments you want to record. It will convert the analogue signal into a digital one.
But isn’t that what the sound card already does?
Yes, but the audio interface converts the signal at a much higher quality. Engineers get obsessive with these little boxes, on their quest for the purest sound.
Which audio interface do you need?
For your home recording studio, you can pick up a simple two channel interface like the M-Audio M-Track Solo for just $50. Two channel means there’s 2 inputs for connecting 2 sound sources at the same time. But are 2 channels enough?
If it’s just you singing and playing the guitar, two inputs are plenty.
But if you were recording, say a live four piece band, you’d need at least 8 inputs. Two for the singer with guitar, one for the bass, two for the stereo keyboard, and three for the drum kit.
Remember this is only for how many sound sources you want to record at the same time. There’s nothing stopping you from using just one input to build up a whole song, one track at a time.
You’ll also need the audio interface to provide ‘phantom power’ if you plan to use a condenser microphone (see below).
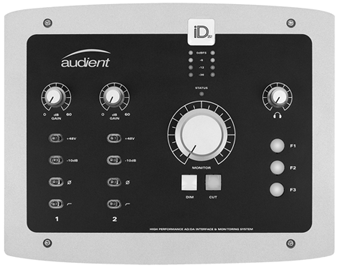
For a combination of quality sound and value, I recommend looking at the Audient range. They all have phantom power.
If you have the budget, take a look at Universal Audio Solo. It’s a two channel thunderbolt interface with incredible sound.

4. Microphones
Every home recording studio needs at least one microphone.
You can use studio microphones for singing, recording acoustic instruments, or even making your own samples. Different instruments are suited to particular mics, and you’ll probably collect a few as you go along. Most studio microphones are classed as dynamic mics or condenser mics.
Dynamic microphones
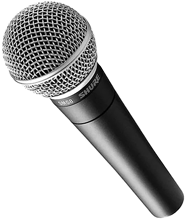
The dynamic microphone is strong, and well suited to the abuse of live performance. Think of the Shure SM58, and SM57, favoured by artists around the world. They’re cheaper than condenser mics, and don’t need any power source.
Dynamic mics are good for capturing loud sounds, but for something more subtle or delicate, a condenser mic may be a better choice.
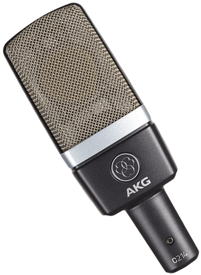
Condenser microphones
A condenser is the more sensitive of the mics, well suited for both vocals and instruments. It captures a warm, full sound, with lots of space around the higher frequencies.
Look for a ‘cardiod’ pattern if you want the mic to record only what’s in front of it. If you have a big beautiful-sounding room to record in, you could opt for an ‘omni’ pattern, which records from all sides.
What microphone do you need?
I’ve collected a variety of microphones over the years, but find myself returning to the same one for most recordings. I suggest starting with two quality mics for your home studio, a cardiod and a condenser, and getting to know each of them well.
A popular condenser is the Rode NT1-A. It’s a versatile, well built, metal mic which has a cardio pattern, meaning it picks up sound from the front of the mic. It can be a bit heavy, so make sure to pick up a sturdy microphone stand for it (more below).
5. Studio Monitors
Studio monitors are very similar to regular hi fi speakers, but there’s one important difference. Hi fi speakers are designed to make the music sound good.
They’ll typically add extra colour and boost the bass. Whereas as studio monitors need to sound neutral. They’re designed to convey an accurate representation of the music you’ve recorded.
Hearing your mixes accurately
If you perfected your music on a pair of hi fi speakers, as soon as you played it back on another system, the mix will sound off. The bass might be too light, or the vocals too thin and distant. It would be the equivalent of painting a picture in a dimly lit room.
If you can hear your mix accurately, you’ll be able to figure out how to get the sound you want. It’s a natural learning process, trial and error, led by your ears.
Not all studio monitors are created equal, and you have to pay a lot to achieve a ‘flat response’.
What size monitor do you need?
It’s also important to get the right size monitor for the room you’re using. The sound from a big monitor in a small home studio will bounce around and cause havoc with the bass.
Studio monitors vary in size, from around 3” (woofer size) to 10”.
Many producers have a second pair of monitors, or low fi speakers, to compare the sound. If you’d like to do this, make sure your audio interface has at least 4 outputs.
I always check my mixes on the car stereo, then play them through the hi fi and laptop.
Genelec monitors
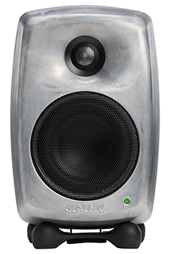
Some of my favourite studio monitors are made by Genelec. They make a range of studio monitors. Each speaker comes with a mini desk pad to help to contain the bass. The small, but solid 3” Genelec 8010A monitor, has a clean and detailed sound.
And if you move into a bigger room, you can add the Genelec 7040a subwoofer, to extend the bass.
For a small to medium room, the 5” Genelec 8030C, which can be paired with the 7050C subwoofer. For medium sized rooms, there’s the 6.5” Genelec 8040B, and for large rooms, the 8” 8050B.
Here’s a list of the Genelec studio monitors, with rough room sizes. Bear in mind that with the right acoustic treatment in your studio, you can place larger monitors into smaller rooms.
| Room size | Bass driver | Frequency (-6dB) | Model |
|---|---|---|---|
| 5 x 5 ft | 3″ | 67 Hz – 25 kHz | 8010A |
| 10 x 10 ft | 4 1/8″ | 56 Hz – 25 kHz | 8020D |
| 13 x 13 ft | 5 1/8″ | 47 Hz – 25 kHz | 8030C |
| 14 x 14 ft | 6 1/2″ | 41 Hz – 21 kHz | 8040B |
| 18 x 18 ft | 8 1/16″ | 32 Hz – 25 kHz | 8050B |
6. Studio headphones
Headphones are a great way of checking your mix. They’re also handy for working late into the night without annoying your neighbours. There’s two types of headphones, open back and closed back.
Closed back headphones
You may already have a pair of closed back headphones at home. The ear cups are sealed on the outside, so they keep the sound from spilling out. Use these when you need to listen to a backing track while recording.
While they’re good at containing and excluding sound, closed back headphones aren’t the best choice for critical listening. The closed design can cause a build up of bass, making then unreliable for mixing.
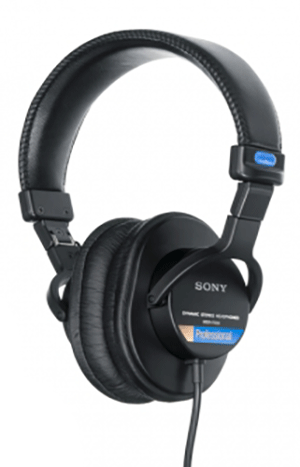
I have several pairs of Sony MDR-7506 headphones, which I use for tracking and recording. They’re left over from a larger studio I used to run, and they’re perfect for the home recording studio.
Open back headphones
When mixing, mastering, and listening to high quality music, choose a pair of open back headphones.
The backs of the ear cups are perforated, allowing air to pass through. This results in a more accurate, clear and natural sound. The downside is that they leak sound into the room, but that shouldn’t matter when listening.
When choosing open back headphones for mixing, look for ones designed specially for studio use. Just like studio monitors, they should be neutral sounding.
They’ll reveal details you haven’t noticed, and can be great for checking the positioning of instruments.
There are limitations to mixing on headphones. They can tire your ears, and it’s best to check how the bass ‘feels’ on speakers.
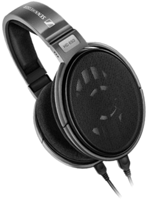
I use a pair of Sennheiser HD650 headphones for checking mixes, and working at night. They’re a pleasure to wear, and have an accurate and natural detailed sound.
I suggest getting an open back and a closed back pair of headphones for your home studio.
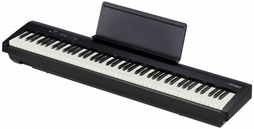
7. MIDI Controller Keyboards
You can use a keyboard or controller with your DAW to play virtual instruments, program rhythms and input data.
There’s a vast array to choice from. Some have piano style keyboards, some have knobs and sliders, and many have a combination of the two.
If you already have a keyboard or piano in your home recording studio, with USB connection, you can use it as a controller. With a keyboard, you can play live virtual instruments such as the acoustic guitar, with expression. Any mistakes can be corrected afterwards. Or if your skills aren’t there yet, input notes into the DAW one by one.
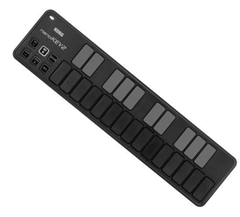
If you’re not a keyboard player, and just need something to input notes, have a look at the Korg nanoKey2, with 25 mini keys. Perfect for the mini studio, or for on the move.
At the other end of the spectrum, for pianists who need 88 fully weighted keys, look at the Kawai VPC1 Virtual Piano Controller. It’s close to playing a real piano, but unfortunately has no pads.
The 49 key keyboard controller
A good middle ground for a home recording studio setup would be the robustly built Arturia KeyLab 49 MKII. It has a full size 4 octave keyboard, plus a selection of sturdy knobs and sliders. It also comes with access to Analog Lab, a collection of virtual synths and keyboards.
There’s also controllers with no keyboard, just a selection of pads and sliders.
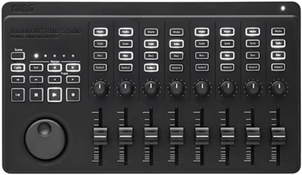
Korg make one called the Korg nanoKONTROL Studio. It looks like a tiny mixing desk, with each of its 8 channels comprising a slider, knob and four pads. I bought one of these to add to some functionality to my existing electric piano.
8. Soundproofing
Soundproofing is concerned with reducing the level of sound leaving and entering your home recording studio. Many websites confuse this with acoustic treatment, which is about improving the quality of sound in a room.
It’s nearly impossible to completely stop noise, but there are things you can do to reduce it significantly.
Room within a room
The professional studio method is to build a ‘room with a room’, where the inner room is separate from the outer room. It involves considerable building work and expense, but is very effective. This method is probably overkill for the typical home studio setup, unless you have a penchant for midnight drumming.
For those without the budget or need for a room within a room, there are other effective options.
Finding the ideal room to record in
The first one is choosing the best room to work in. Look for one which is far away from the street or noisy neighbours. And check that there isn’t a noisy boiler or AC unit nearby, unless you can turn it off when recording.
A detached garage could be an option for a home recording studio, or perhaps a basement room, with no neighbours to the side.
More often than not, an ideal room isn’t available, and you’ll be setting up in a corner of your lounge, or bedroom. This is still entirely workable. You’ll just have to keep the volume down, or work with headphones at night. You can record loud instruments during the day, closing the windows to cut out street sounds.
You may want to consider substituting an acoustic piano for a digital piano or keyboard. Or an acoustic drum kit for a digital set, to keep your home studio quiet.
9. Acoustic treatment
Acoustic treatment is concerned with the quality of sound within your home recording studio. Many websites confuse this with soundproofing, which is about reducing the level of sound entering and leaving the room.
Think of all the hard objects in a room – the floor and ceiling, all the walls, and any solid furniture. When you introduce sound to a room with so many reflective surfaces, it repeatedly bounces around. You’re left with an echoey noise, with random spikes in various frequencies.
This makes it impossible to get a clean recording, or to accurately hear back what you’ve recorded.
Getting acoustic treatment right
Egg boxes on the wall for soundproofing or acoustics is a myth! The same goes for covering every square inch with carpet. This will just affect the highest frequencies, leaving a boomy dull sounding room.
Acoustic treatment helps to control and absorb the reflected sound. It’s achieved by strategically placing a series of acoustic panels around the room.
Acoustic panels
You can buy various styles of acoustic panels for your home studio, either separately or as studio packs. Auralex have a free service where they’ll specify exactly what you’ll need for your room. It’s well worth using to get an idea of how many panels you need, and where to place them.
The panels are often made of foam or fibreglass. They absorb different frequencies depending on their shape and size.
Many musicians opt to make their own panels at a fraction of the cost.
DIY acoustic panels
To make your own you’ll need some basic carpentry skills. I made a set of 15 about ten years ago, with wooden sides, and different coloured fabrics. They can be moved around, to create temporary vocal booths when needed.
Planning where to place the acoustic panels
Before treating your studio, first decide where you’ll be setting up the desk and monitors. Your monitor should be the same distance from you as they are from each other. They should also be around ear level when sitting at the desk.
The aim is to stop any troublesome reflections, without completely deadening the room.
Place panels behind your speakers, above your head, and in the two corners behind you. Heavy curtains, soft furnishings, rugs and duvets all help to absorb sound. If there’s room for a sofa behind you, it can help with sound absorption, and provide a great place to relax!
Here’s a typical home recording studio setup in a rectangular room. Acoustic panels are placed at mirror points, with bass traps in the corners.

10. Stands and cables
You’ll need a selection of cables to connect everything in your home recording studio together.
For digital signals, you’ll use USB or thunderbolt cables. And for audio signals you’ll use XLR connectors and ¼” connectors.
Don’t compromise your recordings by buying the cheapest audio cables. Buying midrange is better for sound quality and longevity. Order them no longer than you need, and watch that you don’t lay them alongside electricity cables.
Look for a midrange microphone stand too. I still use the first mic stand I ever bought, a K&M 210/2.
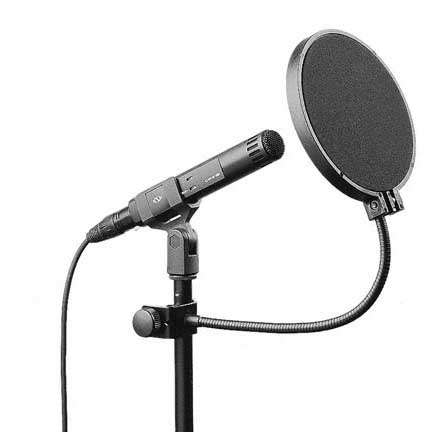
If you’re recording vocals, add a pop filter to your list. It’s an inexpensive fabric screen placed between the singer and microphone.
It breaks up little explosive ‘pops’ of air, which can ruin a recording. Check first to see if your mic already comes with one.
11. Studio set up
This is a typical setup for home studios. It combines live recording with virtual instruments.
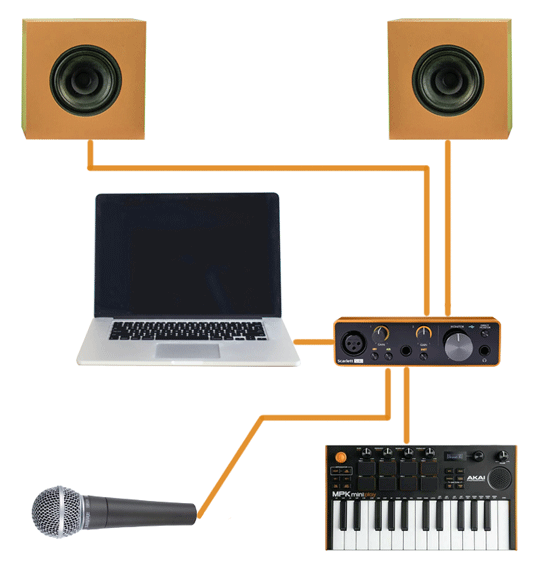
The computer connects to the audio interface, which in turn connects to the microphone, controller keyboard and studio monitors.
12. Online Music Production Courses
The purpose of setting up a home studio is to have a creative space where you can relax and make music.
Keep your workflow simple, and easy.
Make sure to invest some time into learning how to use the software properly. You don’t want to frustrate those moments of inspiration.
Keep Learning – master an acoustic instrument, or develop your musicality by learning to read music.
Education is the key to getting a pro sound. I’ve made a guide to help you choose the Best Online Music Production Courses available right now
And stay creative by taking care of your mental health.
You are after all the most important piece of equipment in the studio.
Author: Daren Banarsë

I studied classical piano and composition at Trinity College of Music, at undergraduate and postgraduate level.
My music has been performed at the Southbank Centre, Tate Modern, and the Courtauld Institute, and broadcast on BBC Radio 3, Radio 4 and countless TV shows, including The Apprentice, Top Gear and Horizon.
I’m a former lecturer on the music BA Music Course at Goldsmiths College, University of London. I have an enthusiasm for making and playing melodicas, and I’m currently working in London as a composer.