The Definitive iLoud MTM Review
Technology meets tradition in these compact super-monitors

Reviewed by: Paul Narang
Review date: July 2022

IK Multimedia iLoud MTM Review
| Pros | Cons |
| Automatic room correction Small footprint EQ controls Accurate stereo imaging and bass Good for difficult rooms | Not for super loud monitoring |
Studio Monitors – iLoud MTM Review
Following on from the popular iLoud Micro Monitor, the iLoud MTM introduces a double woofer system and the ability to tailor the sound to the room.
This is a feature packed studio monitor in a compact package, capable of near flat frequency response and revealing incredible detail.
What are they?
The iLoud monitors are made by IK Multimedia, an Italian company with a background in software development. They currently design and manufacture pro software, apps and hardware for the music industry.
IK Multimedia’s two studio monitors, the iLoud Micro Monitor and the larger iLoud MTM have created quite a stir in the music industry due to the combination of diminutive size and accurate sound.
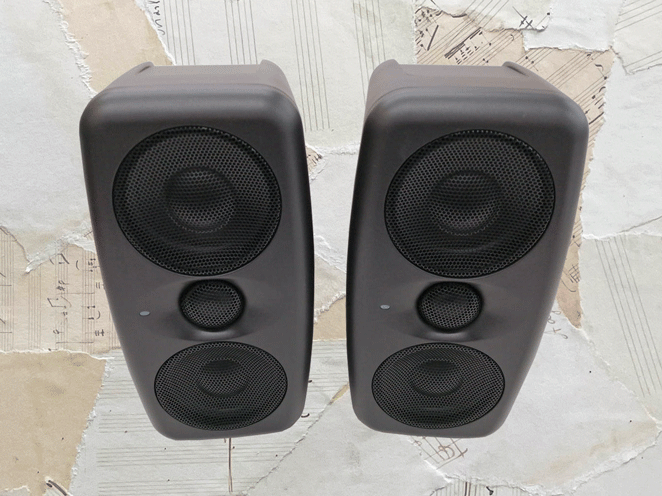
The iLoud MTM Monitors review here are small speakers, making use of the D’Appolito configuration – two 3.5” woofers, either side of a 1” tweeter. They’re rear ported, with EQ controls, DSP technology and integrated room calibration.
They can be used on the desktop or with microphone or speaker stands, either vertically or horizontally placed.
On paper, these little monitors deliver a neutral frequency response across the range, and bass extension to 40 Hz. But that’s in the realm of much bigger and more expensive monitors – does it really live up to its claims?
In the box
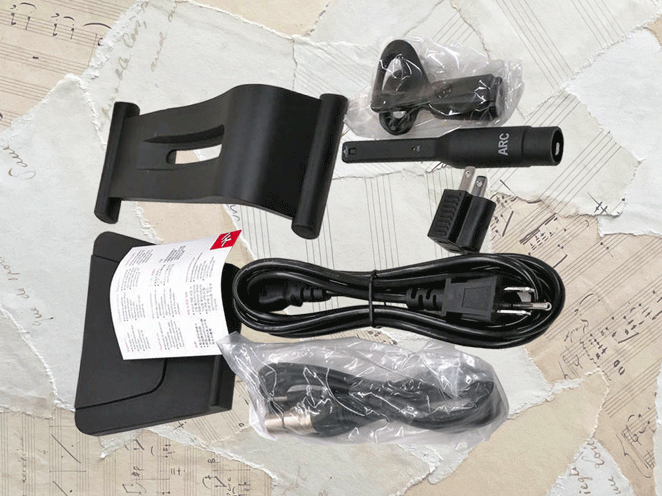
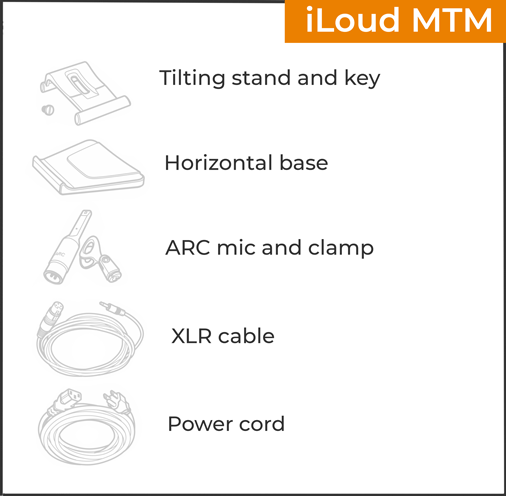
You can buy the iLoud MTM monitors as a pair or as single units. Buying them singly means you get an extra sparemeasurement microphone for the same price!
Also included:
- Power cord
- Tilting stand
- Stand’s locking key
- TPU base for horizontal positioning
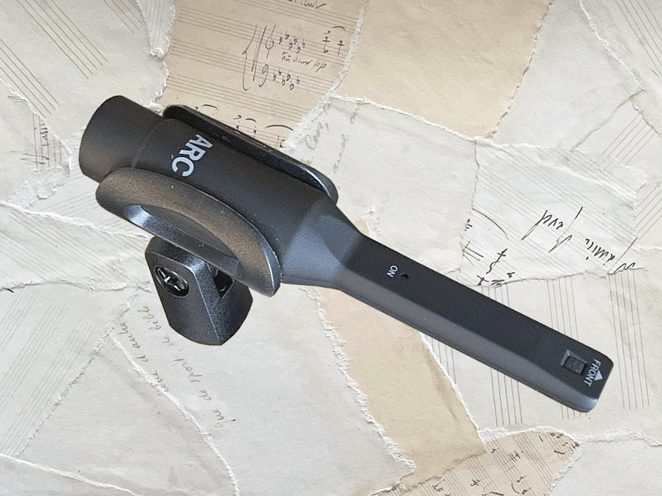
- ARC measurement microphone and clamp
- XLR to 1/8” TS cable for ARC microphone
- Quick start guide
Connectivity
- XLR and 1/4″ TRS inputs

IK multimedia have upgraded the non-professional RCA and 1/8″ inputs of the iLoud Micro Monitor, with a fully professional dual XLR and 1/4″ connector.
This gives you the choice of using either:
- XLR cables (balanced)
- TRS 1/4″ cables (balanced)
- TS 1/4″ cables (unbalanced)
Using XLR cables
XLR inputs are only found on professional studio equipment. They’re balanced, which means the cables are shielded from interference and will carry a higher signal than unbalanced cables.
1/4″ TRS vs TS cables
If you’re using 1/4″ cables, you’ll need two TRS 1/4″ cables. These are different from the very similar looking TS 1/4″ cables, though both will actually work.
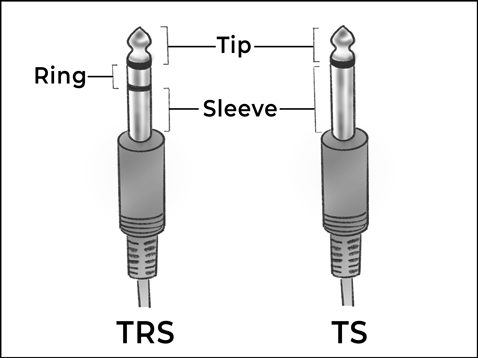
The way to tell them apart is by looking at the connectors. TRS connectors have 2 black lines, but TS connectors have just one.
The advantages of using the proper TRS cables is that they will work like XLR cables – the signal will be shielded, and less likely to pick up noisy interference. The signal will also be considerably louder in volume and of superior quality.
Connecting the iLoud MTM monitors to an audio interface
If your audio interface has XLR connections, you can connect these directly to the XLR sockets on the monitors with XLR cables.
If your audio interface has TRS 1/4″ connections, you can connect these directly to the 1/4″ sockets on the monitors with balanced TRS 1/4″ cables.
Connecting the iLoud MTM Monitors to a computer
The IK Multimedia iLoud MTM monitors can also be connected to unbalanced sound sources, such as a computer or mobile phone. You’ll need to use the 1/8″ (3.5mm) headphones output on your device.
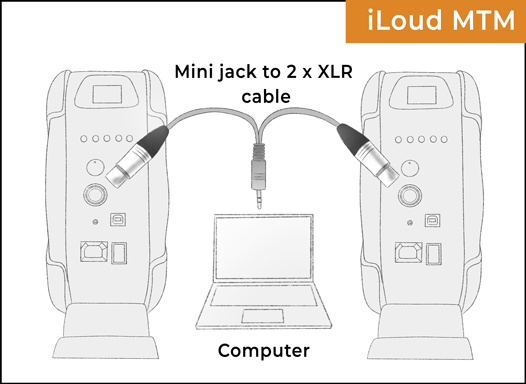
To connect from a headphones output, you’ll have several options:
- 1/8” (3.5mm) Stereo TRS mini jack to 2 x 1/4″ jack cable
This is an adapter lead, available widely.
- 1/8” (3.5mm) Stereo TRS mini jack to 2 x XLR cable
This is an adapter lead, also widely available. But there is also a better quality way to connect:
- Use a stereo DI box
This is a more expensive option, but will give you the best quality sound. A stereo DI box, like the Radial Pro D2, will convert an unbalanced audio signal into balanced, while eliminating hum and buzz caused by ground loops.
You can use one of these with any unbalanced sound source, including 1/4″ or RCA phono outputs on hi fi equipment.
How do I choose the best cables?
Digital Signal Processing
Any signal entering the iLoud MTM is converted into digital format (48kHz, 32 bit), so it can be processed with IK Multimedia’s Physical Response Linearization (PRL) system.
There’s an array of DSP based Eq options to play with before the signal is converted back into analogue before it reaches the amplifiers.
The DSP also optimises the phase response, making it a great feature to compliment the midwoofer-tweeter-midwoofer format that it derives the MTM name from. This is a speaker design perfected by Joseph D’Appolito in the 1980s, where the tweeter is placed between two mid-range drivers.
As well as bringing the output of the drivers into alignment, it causes a narrowing of vertical dispersion. This means less floor and ceiling reflections, as well as desk reflections when placed on the desktop.
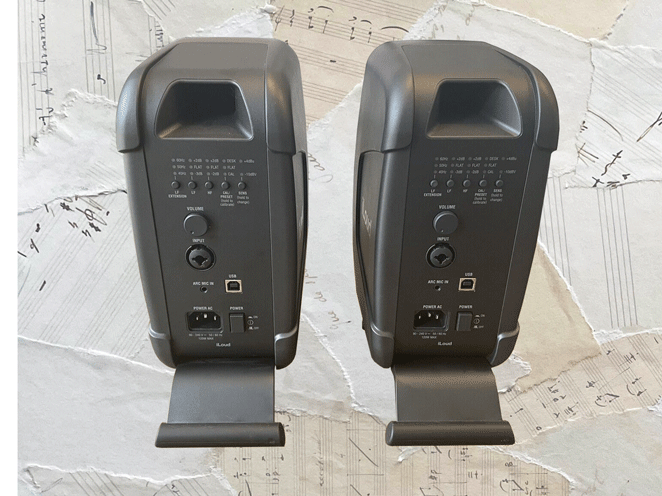
Controls on the iLoud MTM Monitors
On the back of each monitor under the reflex port are 5 push buttons:
- LF Extension
- LF
- HF
- Calibration/preset
- Sensitivity
- Volume control knob
- Power on and off
There’s also an 1/8″ ARC measurement microphone input for room calibration and a USB port for firmware updates.
LF Extension button
This setting can be set to three positions:
- 60 Hz
- 50 Hz
- 40 Hz
This is a high-pass filter that can be set to filter out frequencies below 40Hz, 50Hz, 60Hz. You can also filter out everything below 80Hz if you keep your finger on the button for 3 seconds.
High pass filters allow everything higher than a certain frequency to remain (or pass through), while removing everything under that frequency.
So you might want to set this to 80Hz if you decide to add a subwoofer whose highest frequency response is 80Hz. This will avoid any overlap between speakers.
HF (high frequency) button
This button effects the high frequency output, using a shelf-type EQ. All frequencies above 8 kHz can be reduced or boosted by 2 dB
LF (low frequency) button
This button effects the low frequencies using a shelf-type EQ. All frequencies below 100 Hz can be reduced or boosted by 2 dB.
This switch can be used to compensate for any increased bass caused by nearby walls or the ceiling.
Calibration/preset button
This button allows you to cycle between three settings:
- Desktop
- FLAT
- Calibration
The Desktop setting can be used when you’re placing monitors on a console or a desk. Reflections from a desk surface normally create a boost in the lower midrange. To compensate, this setting applies a bell shaped notch filter taking away 4dB at 160 Hz and adding 1dB at 1.8Khz.
The calibration setting is for use with the ARC room calibration feature – read more below
Sensitivity button
Here you can change the input sensitivity from +4 dBu to and -10 dBV. In general the default +4 dBu position is suitable for professional recording gear. Use -10 dBv for connecting consumer level gear, such as hifi components or your smartphone or computer. You can check the relevant user manuals to confirm.
Volume control knob
You can use this if you need to adjust the input level of the audio source from -12dB to 0dB. Leave it at 0dB unless you have a specific need to reduce the level of the input signal.
ARC Room correction
One of the greatest features of the IK Multimedia iLoud MTM monitors is the ability to tailor them to your unique listening space.
A supplied measurement microphone is used to measure the output of each monitor, from the listening position. The signal is fed back into the monitor, and a corrective Eq setting is applied across the frequency range.
After calibration, the listener should perceive a near flat response when in the sweet spot. The ARC system was very simple to set up:
Setting up the ARC System on the MTM monitors
- Use the supplied XLR cable to connect the measurement microphone to the ARC microphone input on the back of iLoud MTM. The green LED on the microphone should turn on
- Place the microphone where your head will be at your preferred listening position. The mic should be equidistant from both monitors
- Press the Cal/Preset button for more than 2 seconds
- The Cal LED will start to blink blue and the front LED will start to blink white. You’ll have 5 seconds to move out of the way
- Now the monitor will play a series of sine wave sweeps, while the front LED will display a steady blue. Keep quiet during this 10 second process
- Once the test tones have completed, and the calculations are being made, the front LED will blink blue
- Once the calibration is completed successfully, the front LED will blink green for 4 seconds and the back Cal LED will turn on
More calibration options
The ARC system on the MTM monitor is a basic version of IK Multimedia’s full calibration system, called ARC 3.
With Arc 3, you can create measurements for multiple monitors, with a range of listening positions. The sweet spot can be adjusted virtually, to suit various set ups, or client listening.
You can also shape the audio output to emulate popular studio monitors, as well as low fi devices such as TVs and car radios.
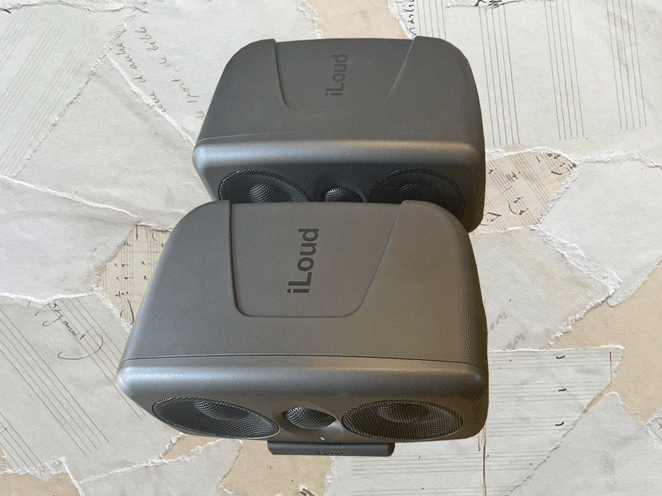
Construction and materials
The iLoud MTM monitors feel strong and sturdy, and surprisingly light at 2.5kg each.
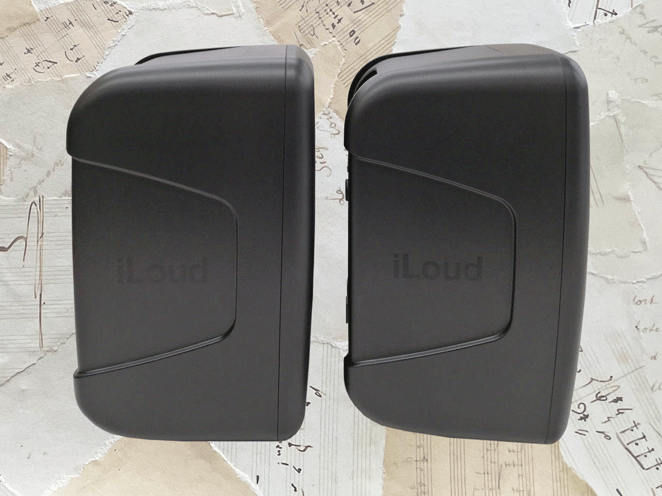
The enclosure is made from injection moulded plastic, finished in a dark grey. On first glance they could be mistaken for the metal cased Genelec monitors.
The drivers site behind strong black metal grilles.
Ported speaker design
The IK Multimedia iLoud MTM monitor has a port at the rear, which disperses soundwaves from behind the woofer into the listening environment. This helps to boost the lower frequencies when using such a small bass driver.
Ported designs (aka bass reflex) are very common on smaller studio monitors.
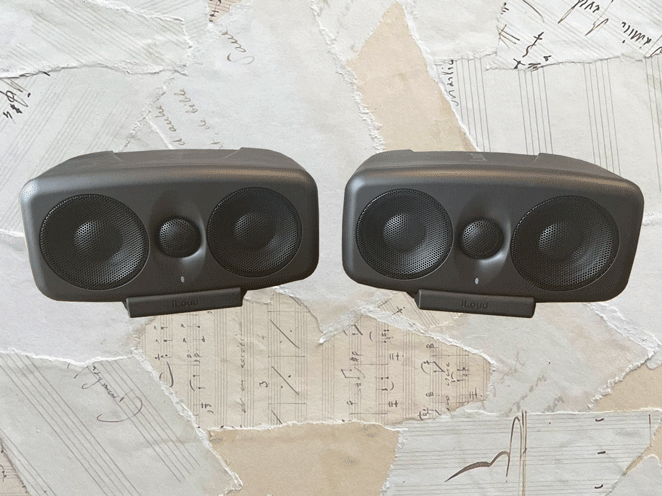
Woofers and tweeters
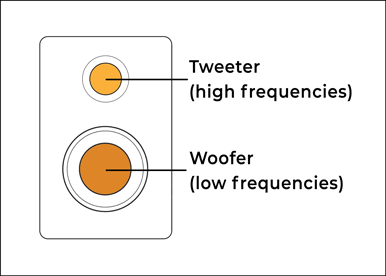
The iLoud MTM monitor has a 1″ silk-dome tweeter, mounted at the exact centre of the monitor. The tweeter has a back chamber which helps to lower the driver’s fundamental resonance.
On either side of the tweeter are two polypropylene 3.5″ mid-woofers. This creates the classic midwoofer-tweeter-midwoofer configuration, which tightens up the vertical dispersion, minimising desktop reflections.
The crossover frequency is 3.1 kHz and the crossover type is linear phase variable.
Because 3 inches is very small for a woofer, there will be some compromise in bass frequencies compared to monitors with larger woofers. That’s the trade-0ff for having small monitors.
Apart from the cost, the benefit of small monitors, with small woofers, is being able to listen with clarity in smaller rooms.
Two Class D amplifiers
The two amplifiers in the IK Multimedia iLoud MTM monitor are efficient Class D amps, delivering 70 Watts to the midwoofers, and 30 Watts to the tweeter. That’s a total of 100 watts per monitor, with a maximum SPL of 103 dB
This is twice the power of iLoud Micro monitors which have 50 watts per monitor.
Tilting adjustable feet
A plastic desk stand can be fixed on to the base of the MTM monitor with a supplied locking key. They can be adjusted to tilt at anywhere between 0° and 20°. This enables you to direct them upwards from a desktop position, towards your ears.
Just like the little iLoud Micro monitors, there’s also a threaded insert on the base of each monitor, which enables you to mount theses on microphone stands.
Height and weight
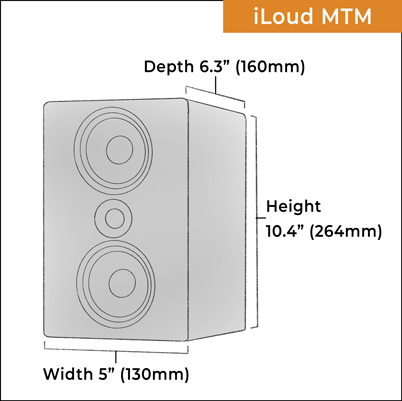
Each IK Multimedia iLoud MTM monitor stands at a height of 264mm (10.4”), with a width of 130mm (5”) and depth of 160mm (6.3”). They weigh 2.5 kg (5.5 lb) each.
Frequency response
The iLoud MTM monitor has a broad frequency response range, extending from 50 Hz (around G1 on a piano) to 24 kHz (±2.5dB).
Once calibrated, the sound is natural and detailed across the entire frequency range.
The LF Extension Setting can be set to 40Hz, which does provide a quiet impression of bass down to the lowest sting of a bass guitar.
The bass is tight and focused.
Design and styling
The IK Multimedia iLoud MTM monitors are elegantly shaped, with a smooth finish and rounded corners. They’re made with injection-moulded plastic, which makes it easier to move away from the traditional shoebox shape of a traditional speaker.
Minimising diffraction
This can help to minimise diffraction – where a soundwave is distorted or modified when hitting an obstacle. It’s not a problem with the lowest frequencies, which pass straight through the case, but can be an issue with higher frequencies.
A fluid design also opens up the possibility of fine tuning, and adding subtle waveguide profiling.
Portability
The iLoud MTM monitors feel quite rugged, with a metal grille protecting each driver. Although they’re not as small as the iLoud Micro Monitors, you could still easily take these with you to other studios, as a familiar reference.
IK Multimedia make a carrying bag specifically for this purpose.
Control surface
There’s a lot of controls, buttons and sockets on the MTM monitors, which have been neatly tucked away at the back. This allows for a sleek minimal design, at the expense of ease of operation. Considering that you should only have to set these up once, this seems like a sensible design consideration.
A white studio monitor ?
Like many other makers of small studio monitors, IK Multimedia have made the MTM monitors available in white. While I haven’t seen these in person, they look a little more refined and classy than their grey siblings.

They come with matching white desk stands, and wouldn’t look out of place in an Apple Mac environment.
An LED on the left of the tweeter illuminates and blinks during various modes and setups.
Placing iLoud MTM monitors on a desk
The MTM (midwoofer-tweeter-midwoofer) design has the advantage of a narrow vertical dispersion, which minimises any reflections from a desktop.
But this means that it’s even more important to match the vertical alignment of the monitors with your ears. Moving out of alignment, either through poor monitor positioning, or leaving your desk, can result in less mid and high frequencies. There should be no objects in between your ears and the monitors – make sure you can see them in full.
As near-fields, the MTM monitors designed to sound optimal for close up listening. They should form an equilateral triangle, with each speaker and your head in one of the corners. This is called the sweet spot, where the sound will be most accurate.
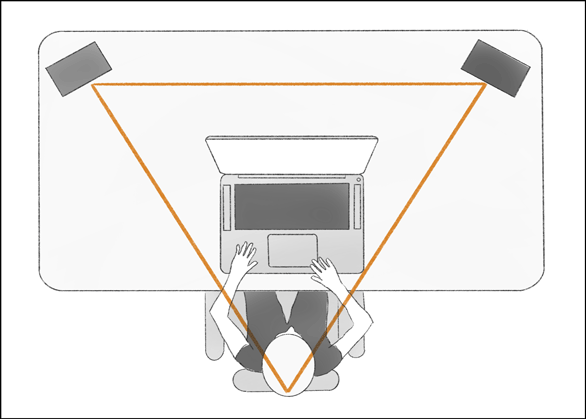
Turn each monitor slightly inwards, so the tweeters are inline with your ears. The iLoud MTM monitors monitors also have a tilting base, so you can angle them upwards to point towards your ears.
For the best acoustic experience, place your desk symmetrically, midway along the wall. This will ensure that both monitors have a similar acoustic environment.
The IK Multimedia iLoud MTM monitors can also be positioned on their side with a supplied desk stand. But bear in mind, the sweet spot will be more limited, so only do this as a last resort. Once the monitors are in place, you can experiment with the equalisation controls on the back, to get an accurate sound.
Using Stands with the iLoud MTM monitors
If you want the best sound from your MTM monitors, you’ll need to move them away from reflective surfaces like the desk, computer monitor and studio walls. Every reflection adds extra colours to the mix, and distorts the clarity of the sound image.
The iLoud MTM monitors have threaded sockets on the base, allowing for easy connection to a microphone stand.
If you have room in the studio, you can also use a more conventional heavyweight monitor stand.
For optimum sound, IK Multimedia iLoud MTM monitors should be placed at least 8 inches away from any wall.

Performance
So how did the iLoud MTM monitors perform, both on the desktop, and on speaker stands? And did the ARC built in digital calibration make any difference to the sound?
How the MTM Monitors sound out of the box
I placed iLoud MTM monitors on speaker stands which were already situated in an ideal listening position. There’s considerable acoustic treatment in the studio, including bass traps behind each speaker.
First impressions were of a capable and serious monitor. It had an understated sound, but there was clearly depth and detail. I left the Eq extension at the default 50Hz.
I then tried them in the office, placed on a desktop on either side of a computer monitor. The office is small and has very little soundproofing or sound absorbing furniture. I positioned them to point upwards towards my ears, using the tilting stands.
As expected, the sound was muddy, the bass unfocused and indistinct. There was little in the way of image clarity. Enabling the Desk switch did make a difference, but it was still far from workable as a reference monitor.
How the MTM Monitors sound after calibration
Leaving them on the desk, I went through the process of calibration, setting up the measurement microphone where my head would be will sitting in front of the computer.
Listening back after this was a revelation. The boxiness had disappeared, and in its place, a clarity and transparency. While in the sweet spot, I was invited into a three dimensional world, where I could investigate the music in minute detail. The bass had thinned out into a more realistic and accurate representation. It was clearly audible and reassuringly solid.
Moving my head from extreme side to side was a strange sensation, as there was considerable movement in the stereo image, and individual instruments lost their pristine clarity.
I was excited to see how the MTMs would sound in the studio on speaker stands, in a well treated environment. I went through a new digital calibration process, and ran some test tracks.
The sound was instantly more focused, especially the stereo imaging. There was a clarity in the midrange which was very revealing of vocals, and I noticed an overdub which sounded like the singer was a little further away from the mic.
Overall a very neutral and detailed sound across the whole frequency range. These are mature sounding monitors, with a full sounding bass for such a compact size.
Moving away from the sweet spot brought about the expected changes in phase and image clarity, but didn’t have much of an effect on the overall tone.
I wouldn’t use the IK Multimedia MTM monitors for super loud listening. They’re not made for that. As expected, cranking up the volume caused the red LED to flash, and there was obvious distortion.
I also found that the 40Hz bass extension setting didn’t provide useful low frequency information in practice. 50Hz seems like the best setting for my environment.

Verdict: iLoud MTM – the best small monitor?
The IK Multimedia iLoud MTM monitors are a remarkable feat of technology and engineering. The amount they’ve fitted into such compact enclosures is staggering, and a testament to the research that IK Multimedia must have undertaken.
The MTM monitors sound amazing. The output is broadly neutral and accurate across the whole frequency range. They’re clear and detailed, and what they reveal in the midrange might just surprise you. The stereo imaging is spot on.
The iLoud MTM monitors are perfect for anyone working in less than ideal conditions – a small untreated room, on the move, or in a tight space. The ARC calibration enables the monitor to morph itself into whatever you need it to be.
They’re also a great choice as a second pair of studio monitors to compliment the main speakers.
iLoud MTM vs iLoud Micro Monitor
You’re likely to have already heard of the the smaller offering from IK Multimedia, the iLoud Micro Monitors. These came before the MTMs and have received rave reviews across the board.
Maybe you wondering whether to upgrade from the iLoud MTMs, or looking for your first pair of studio monitors?
First of all, the MTM is the bigger speaker, and with that comes a broader frequency response range, (slightly) lower bass extension and more power.
But the bigger the monitor, the harder it is to take with you with ease. This is where the iLoud Micro Monitors really shine – portability.
If you don’t have to move the monitors, and you have space for the slightly larger footprint, the MTM monitors have the advantage of ARC calibration, so you can adapt the sound to suit your room.
Both models have DSP based Eq control and are great for anyone working in a confined space.
Summary
The IK Multimedia iLoud MTM monitors sound fantastic. They’re the perfect choice for anyone needing accurate detailed sound while working in an acoustically compromised environment.