The World’s Best Audio Interfaces
With so many choices, how do you choose the best audio interface for your home studio?

Author: Daren Banarsë
Last updated: January 2024
Choosing the best audio interface
If like me, you’re a solo musician working from your home studio, you’re likely going to need an audio interface with just two inputs that have preamps so you can record up to 2 microphones or instruments at the same time.
If you ‘re new to audio interfaces, or need some explanations, read the Buying Guide in the second half of the article. You’ll be able to see what interface meets your personal requirements.
My favourite 2 preamp interfaces
I’ve made a list of my favourite USB audio interfaces, and an accompanying guide to explain how to choose one.
There was a time when there was a huge difference in the quality of various preamps, but these days, most of them have quiet preamps and decent digital to analogue convertors. All the recommendations are at least 24 bit and capable of 192 kHz sample rates, with the option of 48v phantom power.
So there isn’t really a best USB audio interface – it’s more about what features you need – are you a solo musician, a podcaster, voiceover artist or do you record bands?
Many interfaces are now trying to add back a bit of the noise we’ve spent so many years trying to eliminate – what was once called ‘clean’ is now being called ‘sterile’. So a lot of these audio interfaces have special features to give you an instant vintage sound should you need it.
Just bear in mind that it’s easy to create the very same effects (and infinitely more) from within your DAW. And if you record with the vintage sound from your audio interface, you won’t be able to get rid of it at a later stage in the recording process. But don’t let that stop you from having fun and getting creative.
Best audio interface:
Scarlett Focusrite 2i2 4th gen
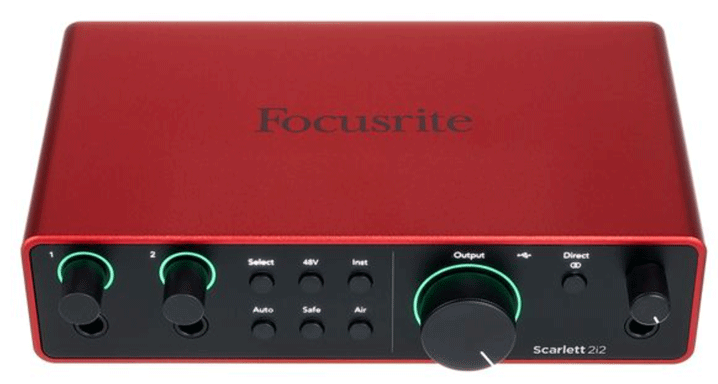
The latest 4th generation of the Scarlett 2i2 audio interface is my top recommendation for the home recording studio. The pre amps and convertors sound excellent and have incredible gain and dynamic range, making it suitable for high end recording.
Add to that the loopback function, great sounding Air modes, and a host of other features which make the 2i2 so easy interface to use, we have a clear winner.
Special mention recording interface: RME Babyface Pro FS
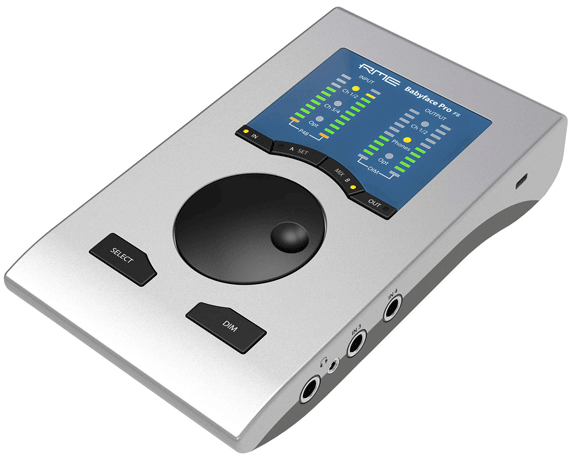
If your main priority is crystal clear, pristine sound, with the highest quality preamps and digital analogue convertors, the Babyface Pro FS should be at the top of your list.
It’s not the cheapest option, but the Babyface Pro FS is packed with features, like dual headphone outputs, MIDI connectivity, digital expansion, and a reliability and build quality which are second to none.
In this round up:
- Focusrite Scarlett 2i2 4th gen – Overall best audio interface
- RME Babyface Pro FS – Best interface for high end audio
- Behringer U-Phoria UMC204HD – Best budget interface
- MOTU M2 – Best interface for audio quality
- MOTU UltraLite mk5 – Best audio interface for versatility
- Solid State Logic SSL2+ – Best interface for iconic heritage
- Universal Audio Volt 276 – Special mention unique audio interface
1. Scarlett Focusrite 2i2 4th gen

Intuitive interface with high quality sound

At a glance:
| Interface type | USB-C |
| Analogue inputs/outputs | 2/2 |
| Preamps | 2 |
| Digital connections | No |
| Live streaming loopback | Yes |
| Stand alone mode | Yes |
| Dimensions | (HxWxD): 47.5 x 180 x 117mm (1.87 x 7.09 x 4.60″) |
| Weight | 595g (1.31 lb) |
The pros:
High spec preamps and convertors
Value for money
Simple to use, with intuitive layout
Auto Gain, Clip Safe and Loopback
The cons:
No 5-pin MIDI socket
What is it?
The Focusrite Scarlett 2i2 is the world’s best-selling audio interface for the home studio market. This 4th generation, 2 input, 2 output USB-C interface delivers a detailed and clean sound, suitable for a wide range of instruments and vocals.
Features
An attractive and distinctive red aluminium casing sets the Scarlett range apart in looks and quality. The knobs are sturdy and have ‘gain halos’ wrapped around them in lieu of traditional LED meters.
On the front panel are two TRS jack sockets for your line inputs – mixers and audio equipment. You can also plug in instruments such as electric guitars which need a bit more gain, by pressing the ‘Inst’ button. Each socket has its own rotary dial for setting the optimal gain.
But what if you’re new to audio and don’t want to bother with gain setting? Simply press the ‘Auto gain’ button and the 2i2 will set the levels for you. If you had any other worries about your mic level being too high, you can press the ‘Clip safe’ button, which automatically reduces the gain when it senses its about to overload.
There’s a couple of other nice features for enhancing the sound from your mic or instrument – the ‘Air Presence’ button, and the ‘Air presence and Drive’ button. Like the 3rd generation 2i2, the Air Presence adds an airy quality, opening space up in the higher frequencies to add clarity and detail. This can sound great on vocals and acoustic guitars.
New to the 4th generation Scarlett 2i2 is the ability to add ‘Air presence and Harmonic Drive’. As well as subtly boosting the higher frequencies, it boosts the bass, adding a classic analogue style warmth and drive to your audio signal.
On the back panel are two XLR inputs for microphones, as well as two 1/4″ jacks to power your studio monitors. There’s also a USB-C socket to connect to your computer, and a power socket so you can use the 2i2 as a stand alone device.
The digitally controlled preamps are a big improvement from the third generation, revealing phenomenal detail and clarity from a range of mics. With the huge 69 dB of gain range, the Scarlett 2i2 4th gen will be very happy all types of mic inputs, including low level dynamic mics such as the SM7B or SM58.
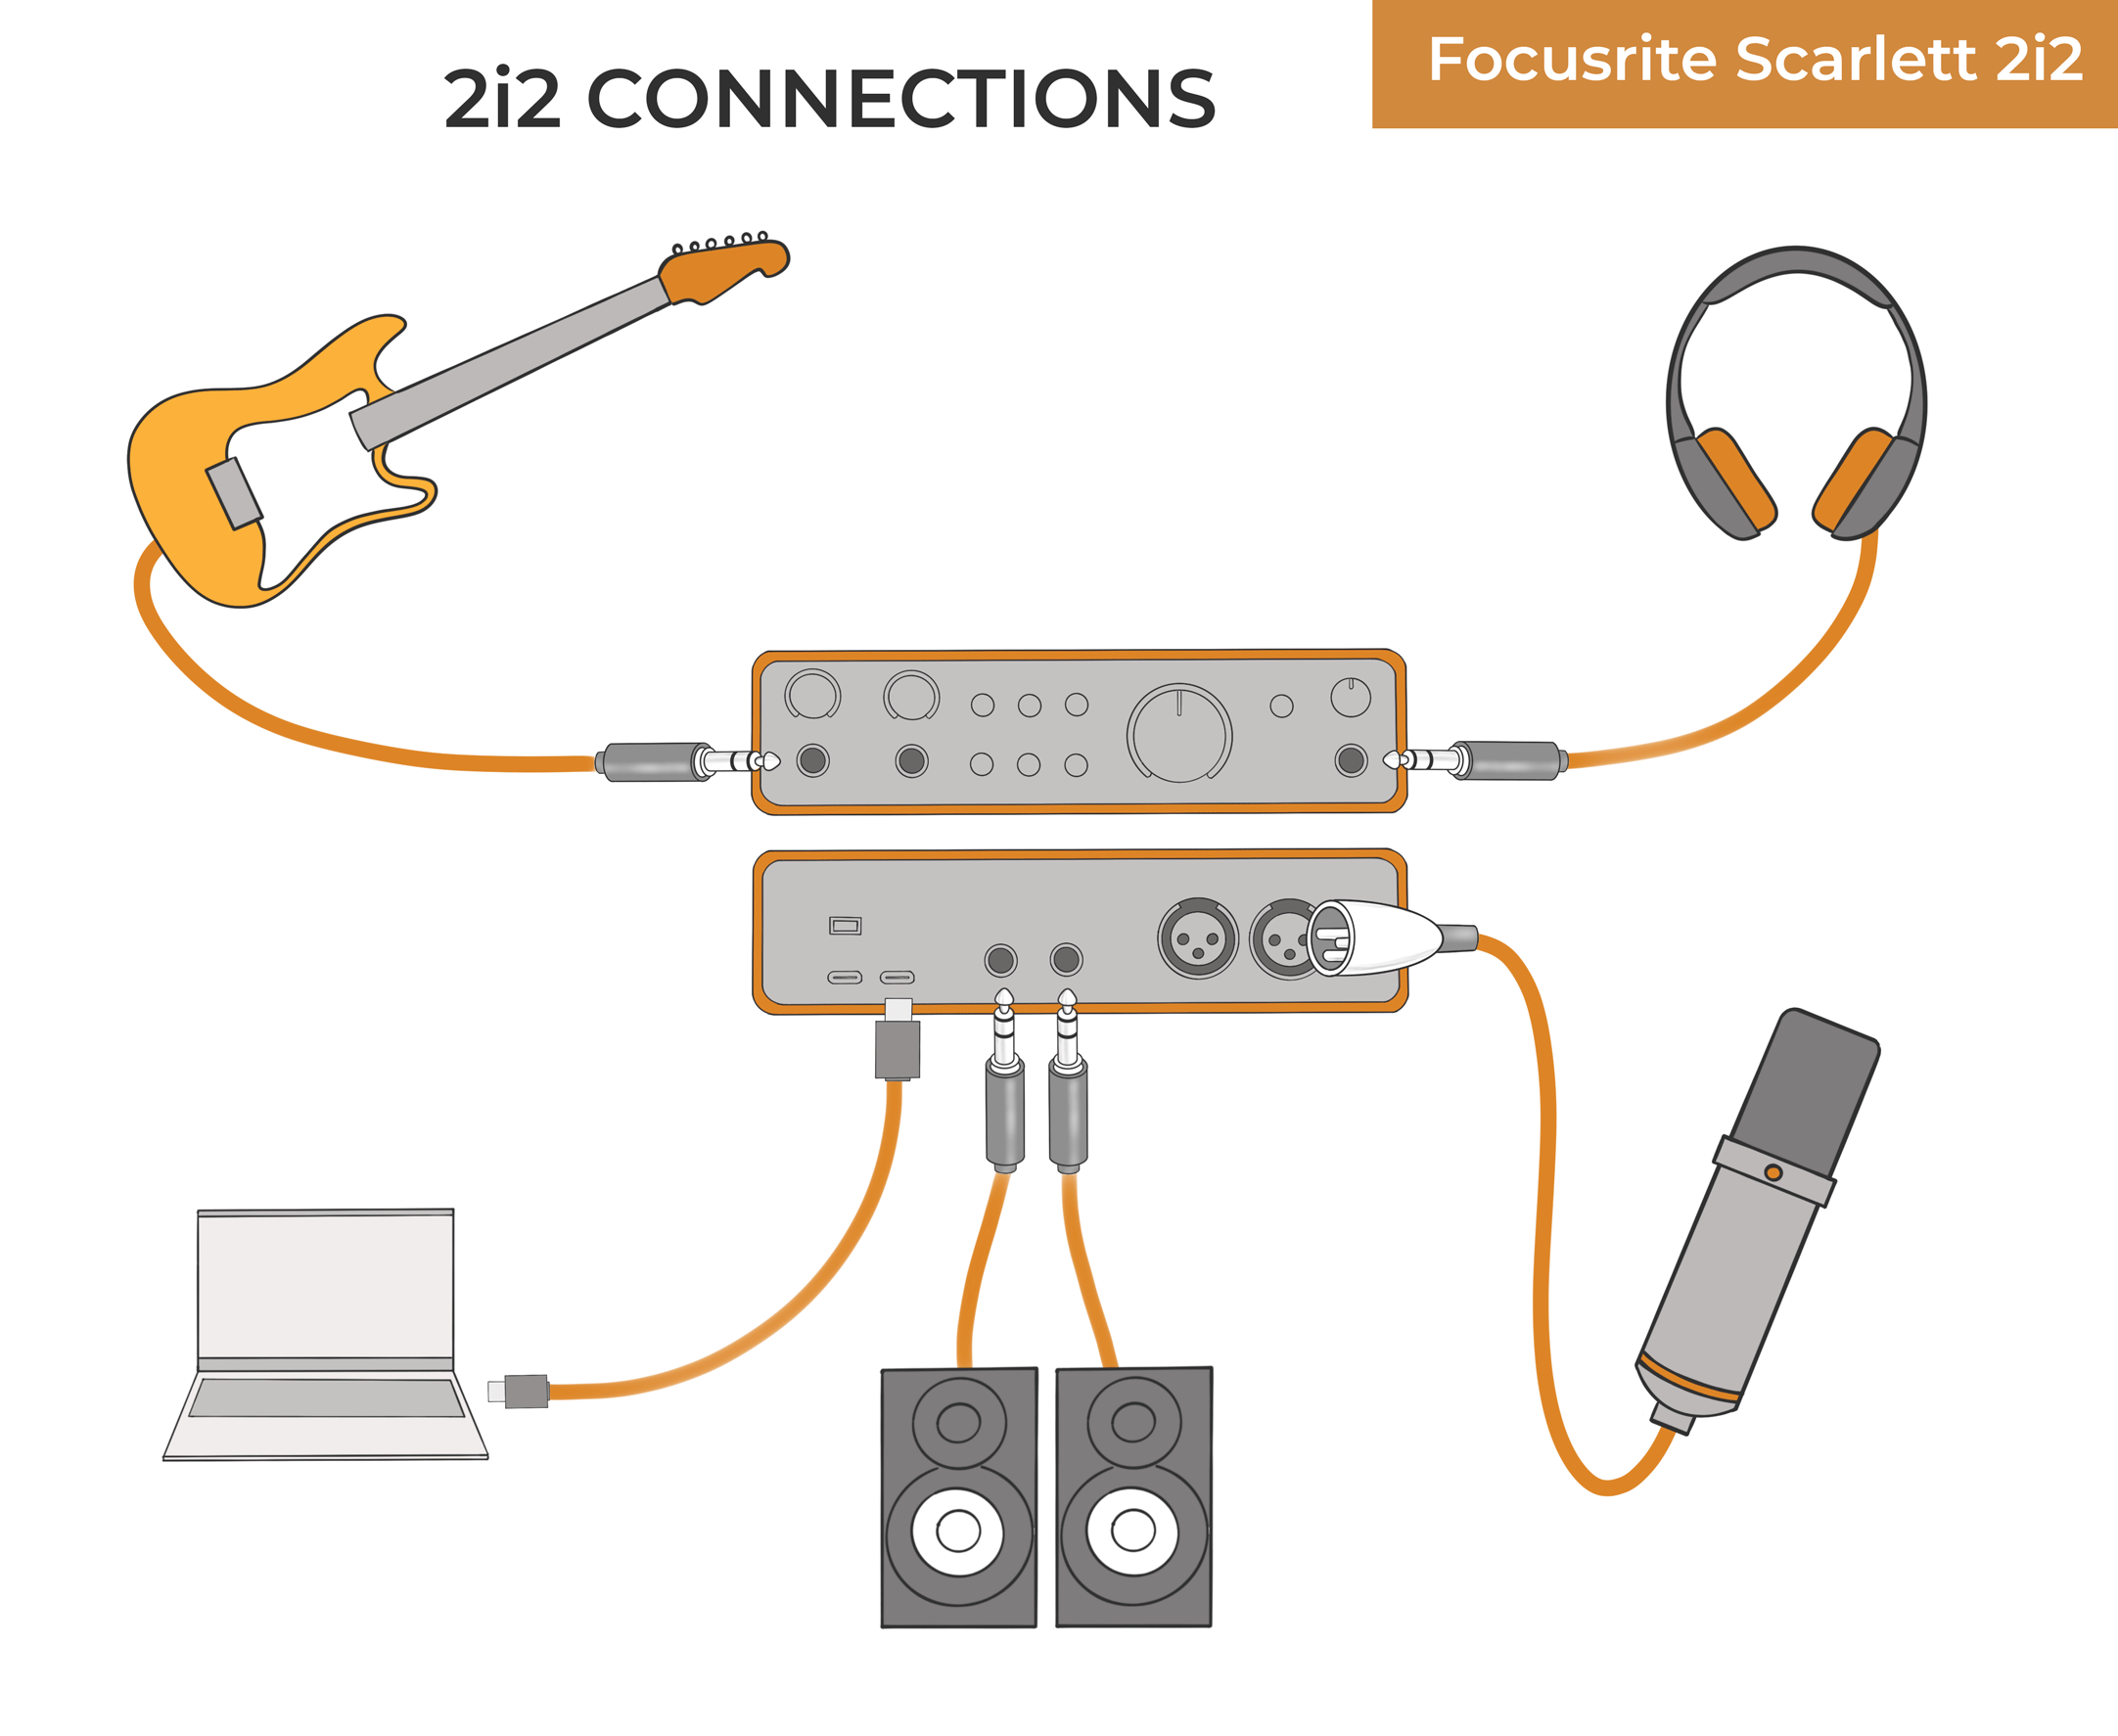
Need more channels? Look at the Focusrite Scarlett 4i4 4th generation, which adds 2 more line inputs, and 2 more line outs. This means you can record 4 simultaneous sound sources, and power 2 sets of studio monitors.
Verdict
With the addition of some very useful software to get you started in recording music, there’s many reasons to give the Scarlett 2i2 the top spot in this audio interface round up.
With the enhanced mic pre amps, exceptional dynamic range and gain, along with the top quality RedNet digital convertors, the 2i2 brings high end audio to home recording sessions.
Read the full Scarlett Focusrite 2i2 Review here
2. RME Babyface Pro FS

Best interface for high end audio

At a glance:
| Interface type | USB-C |
| Analogue inputs/outputs | 4/2 |
| Preamps | 2 |
| Digital connections | SPDIF, ADAT |
| Live streaming loopback | Yes |
| Stand alone mode | Yes |
| Dimensions | (WxHxD): 108 x 35 x 181 mm (4.25″ x 1.4″ x 7.1″) |
| Weight | 680g (1.5 lb) |
The pros:
Solid build quality
Pristine clear sound
Customisation options
Portability
MIDI
The cons:
Not cheap
What is it?
The Babyface Pro FS is a high quality 2-input 2-output USB bus powered audio interface. Noted for its high degree of flexibility and customisation, the Babyface Pro FS has stunning mic preamps and digital analogue convertors.
Features
The first thing you’ll notice is just how solid the Pro FS is – it’s like handling a smooth metal brick. It has a minimal design, just 6 assignable buttons and a dominating wheel in the centre with an indentation to dial in your requirements.
Above the rotary dial is a set of four level meters for an indication of input levels (on the left) and outputs (on the right). You’ll use the dial to set input gain and many of the other features which lie under the hood of this powerful interface.
On the rear panel are two XLR microphone inputs, delivering an impressive 76 dB of gain. These XLRs can also be switched to accept balanced line level inputs.
Whether your using the XLRs on the back or the 1/4″ jacks on the side for your line level inputs, you can expect a near perfect flat frequency response. There’s plenty of dynamic range using either inputs too – 116.2 dBa on the XLRs and 118.5 dBA on the instrument line inputs, with imperceptible distortion.
On the right side of the Babyface Pro FS are 2 line or Hi-Z instrument inputs, which will automatically detect from your signal. You’ll use these inputs for recording electric guitar or bass, or for plugging in audio equipment.
There’s a choice of 2 headphone sockets, a low impedance 3.5mm jack, and a 10 ohms impedance 1’4″ jack. These give you a great deal of flexibility for matching whatever headphones you have to hand while maintaining optimum audio accuracy. You can use 2 headphones at the same time, but there’s no separate volume controls.
On the left side of the Babyface Pro FS, there’s a midi socket – use the supplied lead to break it out into 2 old school 5 pin plugs. From that you can connect keyboard, drum machines or midi controllers. There’s also a digital in and out for a range of expansion options – choosing between SPDIF and ADAT to add another 8 channels.
There’s also a 12v DC power socket for using the Babyface in stand alone mode, and an extra beefy USB-B socket to avoid any loose connections.
RME is well known for its stable drivers and reliable clock – especially important when you’re linking other digital equipment, but also a good indication that this is a piece of equipment unlikely to fail when you’re playing live.
With top quality preamps and digital analogue convertors, the sound is as pristine and clear as I’ve heard – transparent and honest. I tested the FS Pro with several mics, and a variety of recording situations. It performed flawlessly, no hiccups, just superb nuance and clarity.
The final thing to mention is the Totalmix software – a very powerful mixer capable of the most complex routing should you need it. It includes effects, talk back capabilities, and 3 bands of EQ on the outputs. If you don’t have time to explore the depths of Totalmix software, you can simply set it to ‘digital workstation mode’, where you can seamlessly integrate it into your DAW.

Need more channels? Take a look at the more expensive RME Fireface audio interfaces. The Fireface UCX II still only has 2 preamps, but the 802 FS, UFX II and UFX III all have 4 preamps, along with many other professional features.
Verdict
The Babyface Pro FS is a top quality, brilliant sounding audio interface with a rock solid performance and build quality. From the quiet pre amps, ample dynamic range, to the inaudible distortion and near zero latency, its an obvious choice for the professional musician who needs a combination of quality and reliability.
3. Behringer U-Phoria UMC204HD

The best budget interface for new music makers
At a glance:
| Interface type | USB |
| Analogue inputs/outputs | 2/6 |
| Preamps | 2 |
| Digital connections | No |
| Live streaming loopback | No |
| Stand alone mode | Yes |
| Dimensions | (H x W x D) 46.45 x 185 x 130mm (1.8 x 7.3 x 5.1″) |
| Weight | 0.6 kg (1.4 lbs) |
The pros:
Exceptional value for money
Good range of inputs and outputs
Quiet preamps
Strong build quality
The cons:
Limited LED meters
Needs studio quality headphones for critical listening
What is it?
The Behringer U-Phoria UMC204HD is a 2 channel USB powered audio interface with surprisingly good performance for its budget price. It’s also crammed with features and connectivity options usually only found in more expensive interfaces.
Features
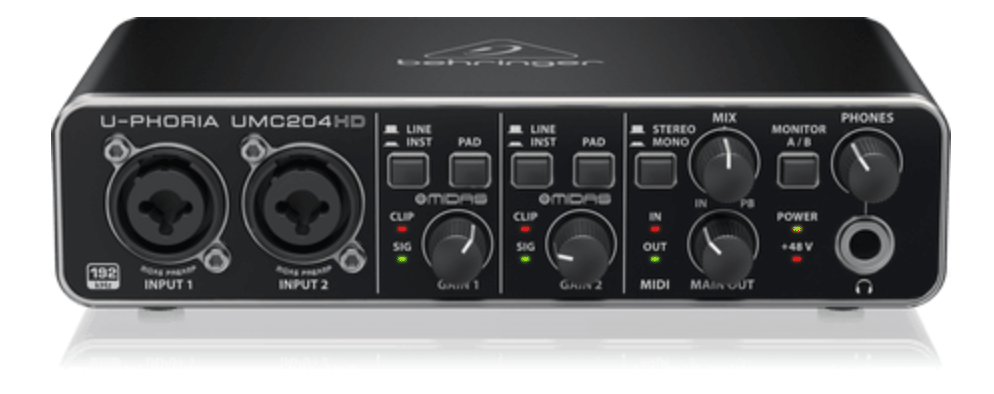
The Behringer U-Phoria UMC204HD has a sturdy, all metal construction, with strong plastic knobs with no wobble. This is a huge improvement over the Behringer UM series which is all plastic construction.
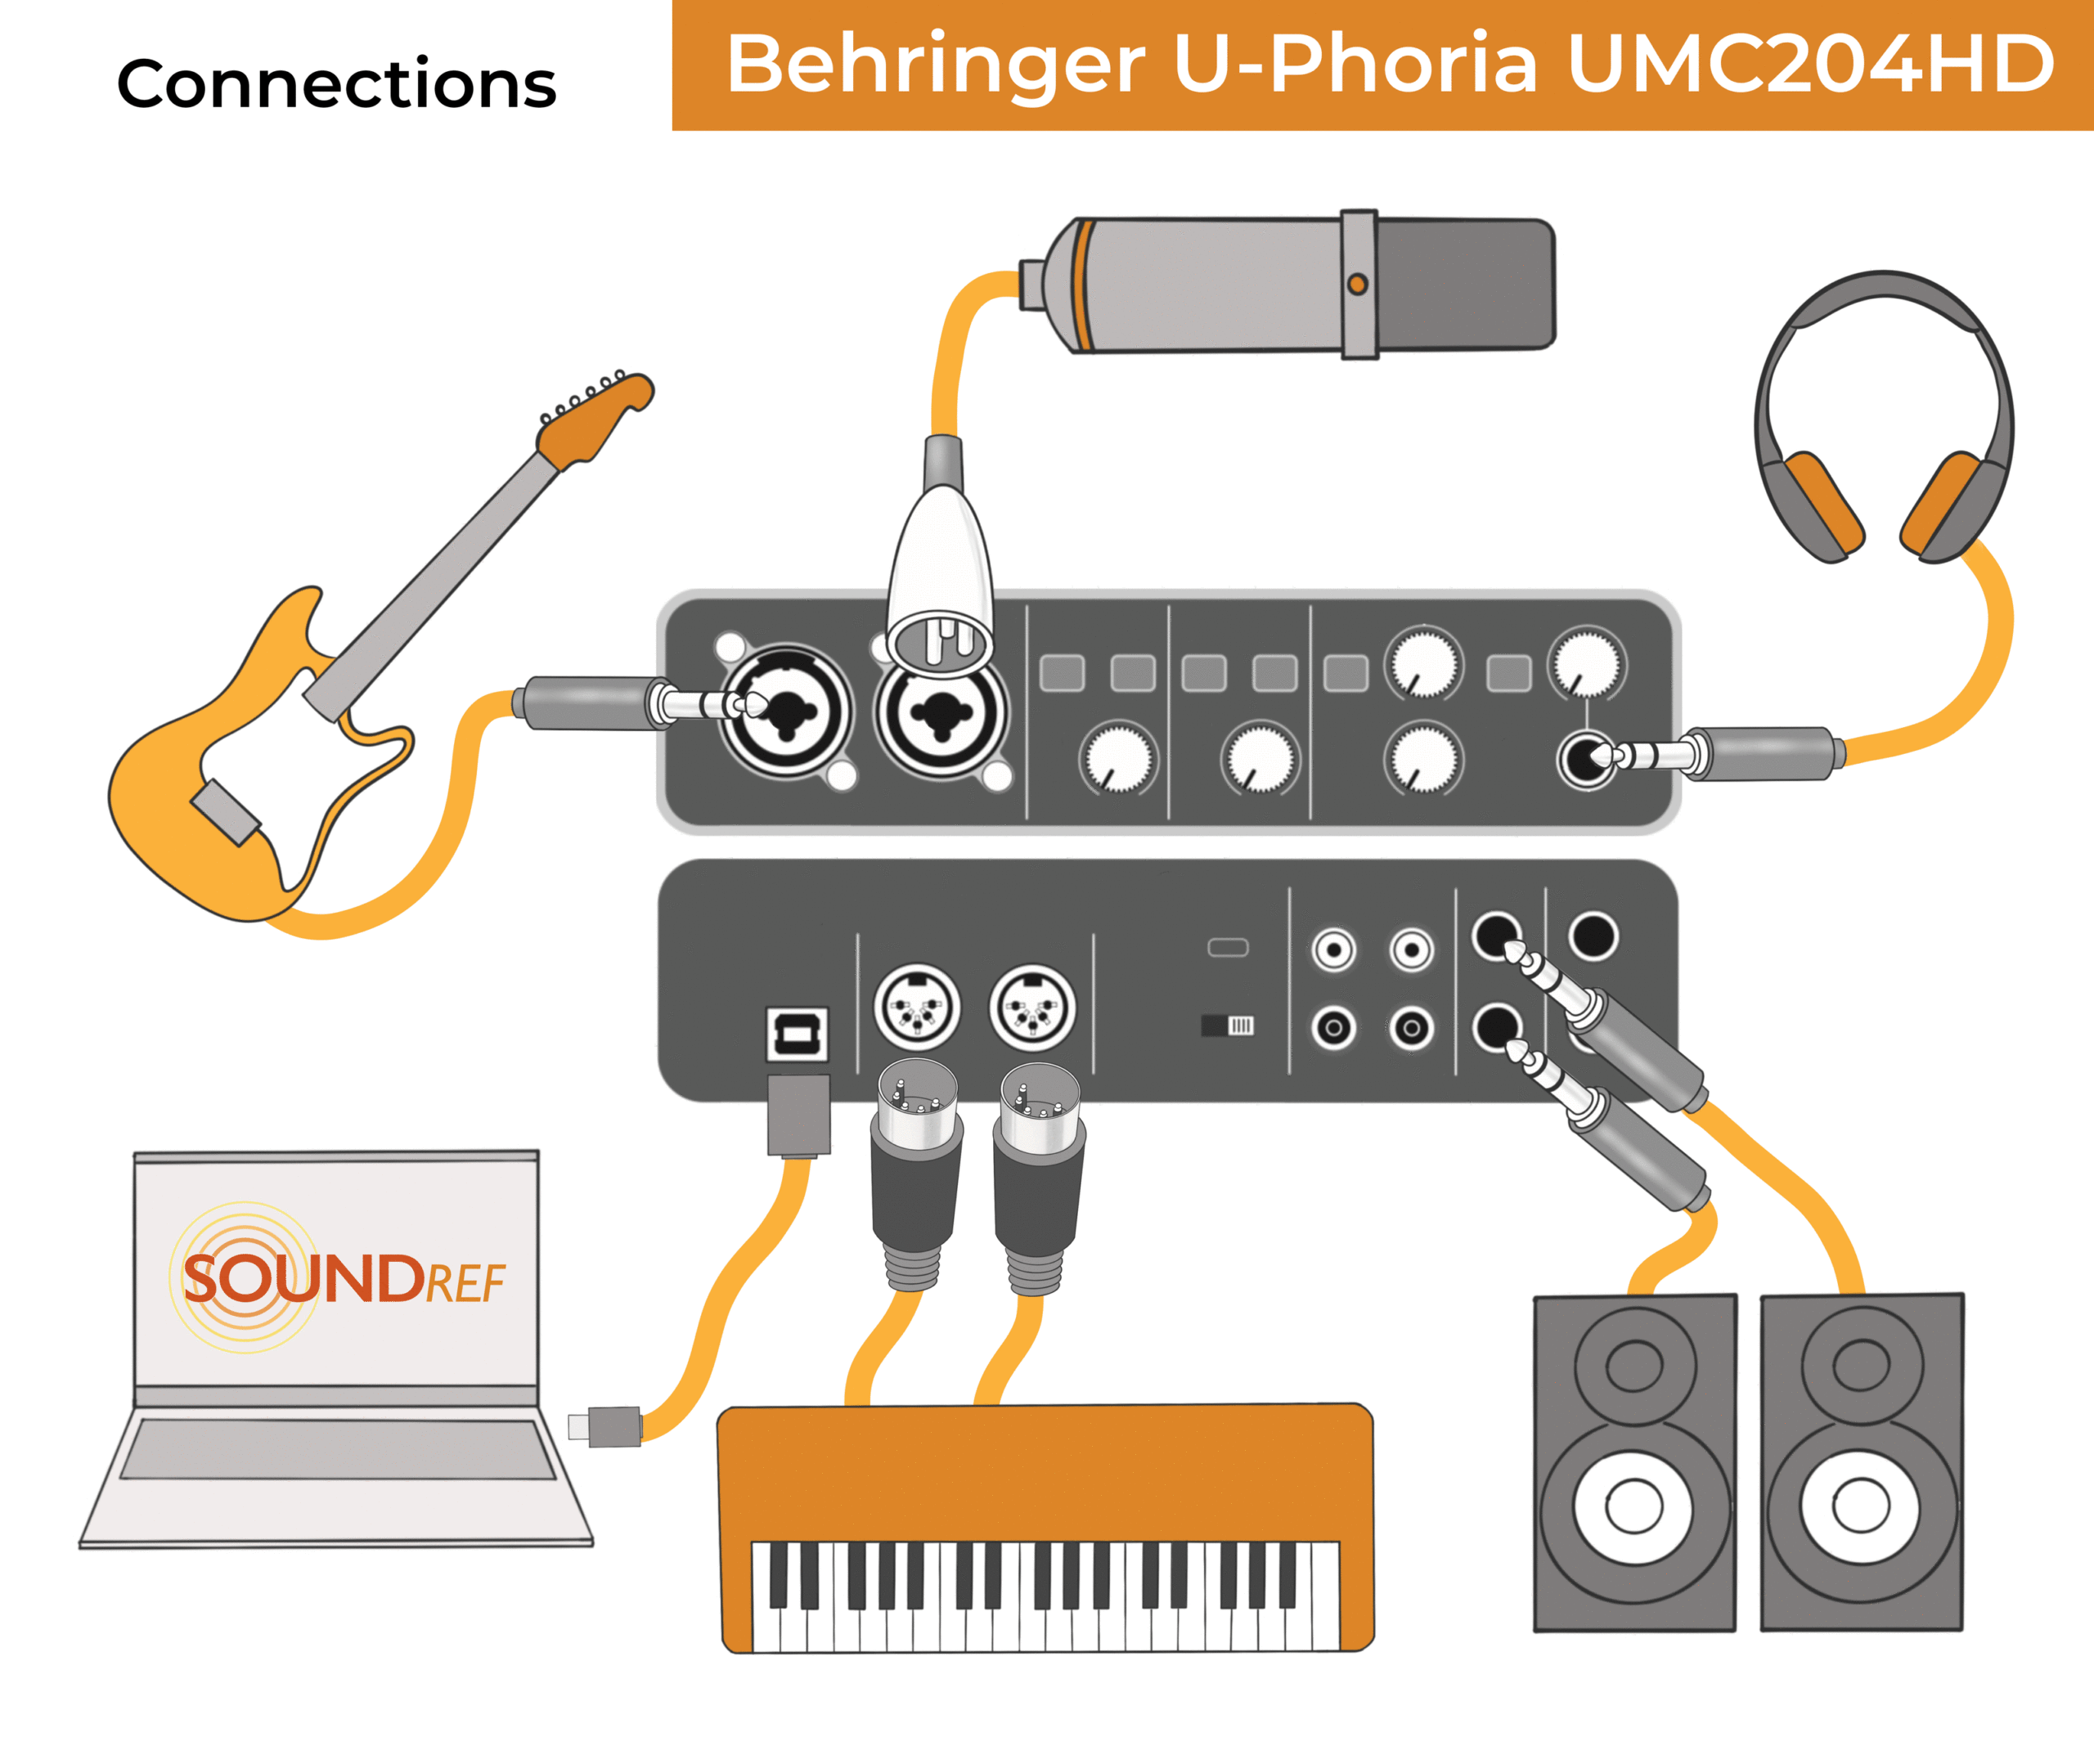
On the front panel are two XLR/6.3mm combo jacks, giving you the choice of using either XLR or 1/4″ jacks. Next to the sockets are some control buttons. One is a switch allowing you to toggle between ‘line’ and ‘instrument’.
You’ll use line when plugging in audio equipment, and instrument for a guitar or other instrument which needs a bit of a signal boost. The other control is a ‘pad’ button, which instantly reduced the input signal by 20 dB.
There’s 2 indicator lights per channel too – the lower one, ‘sig’ lights up green whenever any input signal is detected, and the red ‘clip’ light indicates when signal is too loud. This is like a very basic level meter, but enough to set your gain levels with the gain input knob.
To the right of the front panel is a stereo/mono button to hear what you’re recording in both ears. There’s also a direct monitoring feature – a mix dial enabling you to adjust how much of the computers playback audio you hear, vs the direct microphone signal.
There are two midi in and out indicator lights, showing when midi signals are active, and a main out volume control for your studio monitors. Next to this is also an A/B output button, which switches between 2 stereo sets of extra outputs on back of the interface. There’s a power on light, and phantom power LED. Finally, there’s a 6.3mm headphone jack with it’s own volume control.
On the back of the Behringer U-Phoria UMC204HD is the USB connection, midi in and out sockets, a 48v power switch, which turns on 48v for both channels.
There’s also a set of 2 stereo RCA playback outputs. You can only use one set at a time with the monitor A and monitor B selection switch on the front panel. This gives you some great flexibility in your set up, enabling you to connect a small mixer, recorder or a set of hifi speakers to check your mixes.
Behringer also add two 1/4″ insert points to connect to external signal processors. As well as the RCA outputs, there’s a set of balanced 1/4″ or 6.3mm TRS jacks to use as your main outputs. The volume of these is controlled by the volume control on the front panel.
U-Phoria UMC204HD uses a standard 24 bit digital to analogue convertor, with Behringer claiming a dynamic range of 110dB. Testing seemed a little lower than this, but there weren’t any problems. The mic preamps were quiet, even while using a Shure SM58, a dynamic microphone with a weak audio signal.
There’s no need for an extra Fethead or Cloudlifter to raise the signal. If you’re using a quiet mic, like the Shure SM7B, stay close to the mic and you’ll have plenty of headroom.
A strength of the Behringer U-Phoria UMC204HD has it’s very high max input level of +20 dBu. This means it will handle very loud signals with ease.
Need more channels? Look at the 404 HD for an extra 2 inputs and preamps, giving you a total of 4 XLR/jack 6.3 mm combo inputs. It also has separate DC in case you’re not getting enough USB supplied power from your computer.
Verdict
The Behringer U-Phoria UMC204HD is a great budget audio interface. The MIDAS mic preamps are quiet, and a welcome improvement over the Xenyx preamps of some of the past Behringer interfaces. The U-Phoria UMC204HD also has extra input and output options, making it a very versatile tool for the studio.
As there’s nothing out there at this price point that comes near, the Behringer U-Phoria UMC204HD is incredibly good value for money for anyone making their first foray into home recording.
4. MOTU M2

A simple and practical audio interface with great sound

At a glance:
| Interface type | USB |
| Analogue inputs/outputs | 2/4 |
| Preamps | 2 |
| Digital connections | No |
| Live streaming loopback | Yes |
| Stand alone mode | Yes |
| Dimensions | (W x D x H enclosure only:) 19.05 x 10.8 x 4.5 cm (7.5 x 4.25 x 1.75″ |
| Weight | 0.61 kg (1.35 lbs) |
The pros:
Quiet clean preamps
On/off switch
Individual phantom power switches
Clear LCD metering
The cons:
What is it?
The MOTU M2 is a 2 input, 4 output USB-C powered audio interface with MIDI. Made by Mark of the Unicorn, the M2 is suitable for use with DAWS or stand alone, working with PCs, Macs, Linux and IOS.
Features
The MOTU M2 has a black metal casing, solid build quality, and metal knobs. It’s attractively designed, rounded and minimal – with a colourful LCD display at the centre.
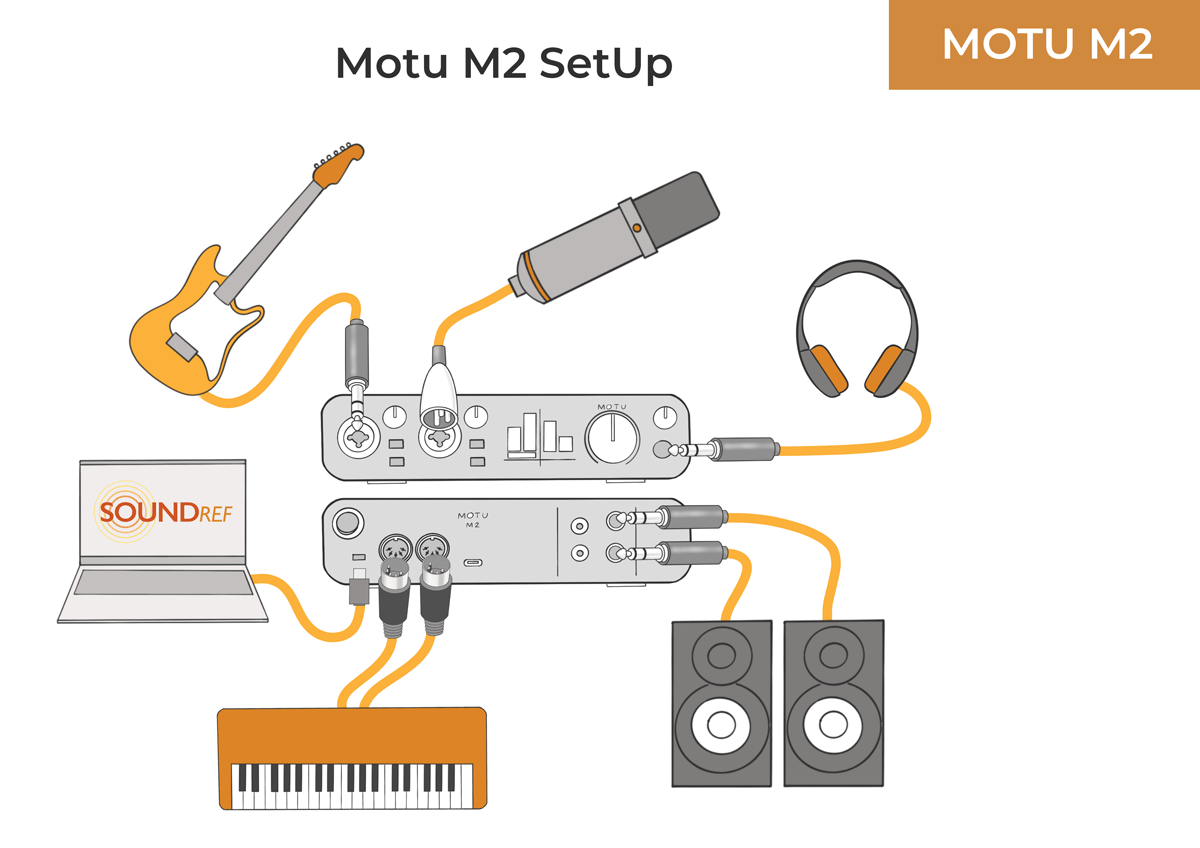
On the front panel are 2 XLR TRS combo inputs, each with their own gain knob, and individual phantom power button. This is useful for the rare occasion that you want to record with a condenser mic in one channel, and a ribbon mic on the other. Condenser mics need phantom power, whereas many ribbon mics can become damaged if plugged into a source with phantom power.
Each input on the MOTU M2 also has its own monitoring button. This is a welcome addition to allow monitoring of your input signals without any latency (delay).
In the centre of the front panel is a small LCD screen – the left side displays input metering, with outputs on the right. They’re bright, colourful and clear – possibly easier to set recording levels than with the Scarlett 2i2. What it lacks though, just like the 2i2, is a dB indicator, so you know at exactly what dB you’re setting to.
To the right of the M2’s front panel is a large, chunky output volume knob, with the headphone socket next to it, along with its own dedicated volume knob.
On the back panel, the first thing I noticed was an on/off switch, which are becoming quite rare on audio interfaces. It saves you having to unplug the M2 from your computer every time you want to turn it off.
There are separate 5 pin midi in and out sockets to connect any old keyboards, and a USB-C connector. A USB-C to USB-B cable is supplied it’s rather on the short side!
As well as a pair of 1/4″ TRS balanced outputs to drive your studio monitors, there’s also a pair of unbalanced RCA outputs. You can use these at the same time to record the output or drive an alternative pair of speakers to check your mixes.
As you’d expect from the frequency range, it’s very flat within the audible range, with a slight taper in the lowest frequencies. I didn’t notice any change in the response while cranking up or lowering the gain, which makes it more sonically stable some of the other interfaces.
The MOTU M2 has a very high dynamic range of 115 dB, taking it very close to the 4th gen Scarlett 2i2. This leaves plenty of headroom for recording, without the addition of noise.
And the preamps are very nice, with a gain range of 60 dB. This is significantly lower than the 69 dB of the Scarlett 2i2. But using an SM7B (a dynamic mic with a weak signal), and talking loudly into the mic there was no problem with noise at all. This would not be the mic to choose for very quiet AMSR work, as you’d have to take the volume to max, and inevitably introduce some noise.
There was no perceivable distortion in either the inputs or the outputs, with a powerful headphone amp. The round trip latency at various settings was spot on, comparable to some of the best interfaces tested here.
Need more channels? If you like the sound of the MOTU M2, but need more channels, there’s two other audio interfaces in the MOTU M range.
The M4 is very similar to the M2, still with just 2 preamps, but also two line-ins, where you could connect external preamps or other audio gear. It also has an extra pair of balanced outputs, and an extra pair of unbalanced RCA outputs, totalling 8 outputs. It also has the additional Input monitor mix’, so you can find your own balance between the sound from your DAW and the input signal.
If you require 4 preamps, have a look at the MOTU M6, which has 4 TRS XLR channels with individual phantom power, plus 2 line inputs (balanced or unbalanced). Instead of RCA outputs, the MOTU M6 has just 4 balanced TRS outputs which can be connected to two sets of professional studio monitors. You also have the option to run it from DC power.
Verdict
The MOTU M2 is a worthy audio interface, and depending on your needs may be seen as a contender to the Focusrite Scarlett 2i2 4th generation.
The preamps are quiet and clear, the dynamic range is good, the distortion very low, and the latency is good. Whereas the Scarlett 2i2 has some excellent features to make the recording process easier, the MOTU M2 has alternative benefits.
There’s an on/off switch, an extra pair of outputs, and individual phantom power switches should you need it. Depending on your taste, you may also find the traditional LCD level meters easier to read. It also comes with a sizeable package of software including 6Gb of loops and sounds from Big Fish Audio and Loopmasters.
5. MOTU UltraLite mk5

Best audio interface for versatility
At a glance:
| Interface type | USB-C |
| Analogue inputs/outputs | 8/10 |
| Preamps | 2 |
| Digital connections | TOSLink, SPDIF, ADAT |
| Live streaming loopback | Yes |
| Stand alone mode | Yes, with device for Cuemix |
| Dimensions | (W x D x H enclosure only:) 220 x 175 x 45 mm (8.6 x 6.9 x 1.75″) |
| Weight | 1.31 kg (2.875 lbs) |
The pros:
Huge range of inputs and outputs
Digital options for expansion
Versatile software with effects and loopback
Excellent sound quality
The cons:
Not USB bus powered
What is it?
The Motu Ultralite mk5 is an eight input USB audio interface, with 2 XLR jacks for microphones and six 1/4″ jack line inputs. With a total of 10 line level outputs, plus extra digital inputs and outputs, it’s a versatile interface with extremely good audio quality.
Features
The MOTU UltraLite mk5 is constructed from 4 metal sections, making it easily strong enough enough for live use as well as the studio. The controls feel solid, with very little play in the knobs.
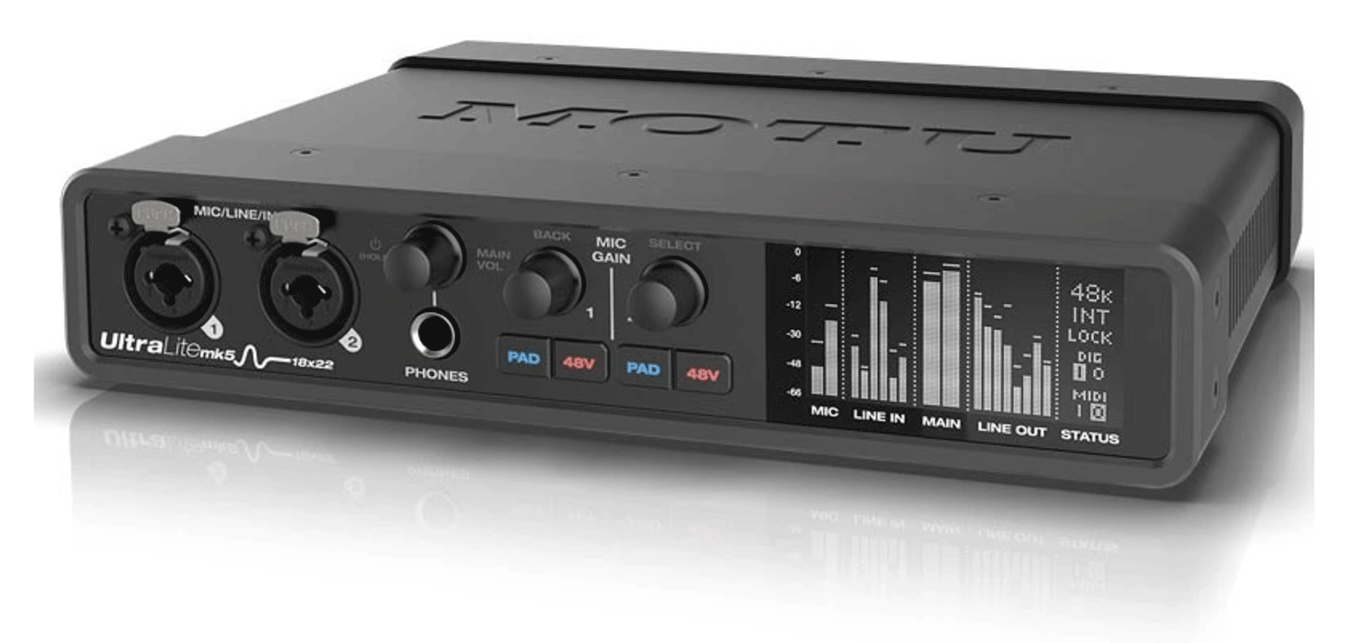
On the front panel are the two combo XLR TRS combo inputs for plugging in microphones and instruments such as guitars. The Mk5 can receive line level, instrument or microphone audio signals.
Each combo input has a separate phantom power and pad switch, which reduces the audio signal by 20 dB. They also have their own gain knobs which control the gain in 1dB steps, from 0 to an impressive 74 dB.
A dedicated 1/4″ headphone jack is easily accessible, with a volume control dial above it. The output impedance is low, so you’ll be able to get good results and a high signal with a variety of headphone types. A small niggle – watch out you don’t spin the dial too fast – it can start missing steps.
Pressing this volume rotary encoder also changes its function, toggling between main volume output and headphone volume. And if you press and hold for a few seconds, it will turn the interface on or off.
On the right of front panel is a black and white OLED display, which is useful to see the levels of all inputs and outputs. The level meters are clear and easy to see, but without green, orange and red warning colours, it’s difficult to see when the signal’s close to clipping. It would be nice to see the vibrant greens and reds of the MOTU M2.
On the back panel is the DC power connector – the Ultralite Mk5 doesn’t draw power from the USB-C connection like most other audio interfaces of this size. There’s a power supply included in box, which is needed to power all of the functions this interface provides.
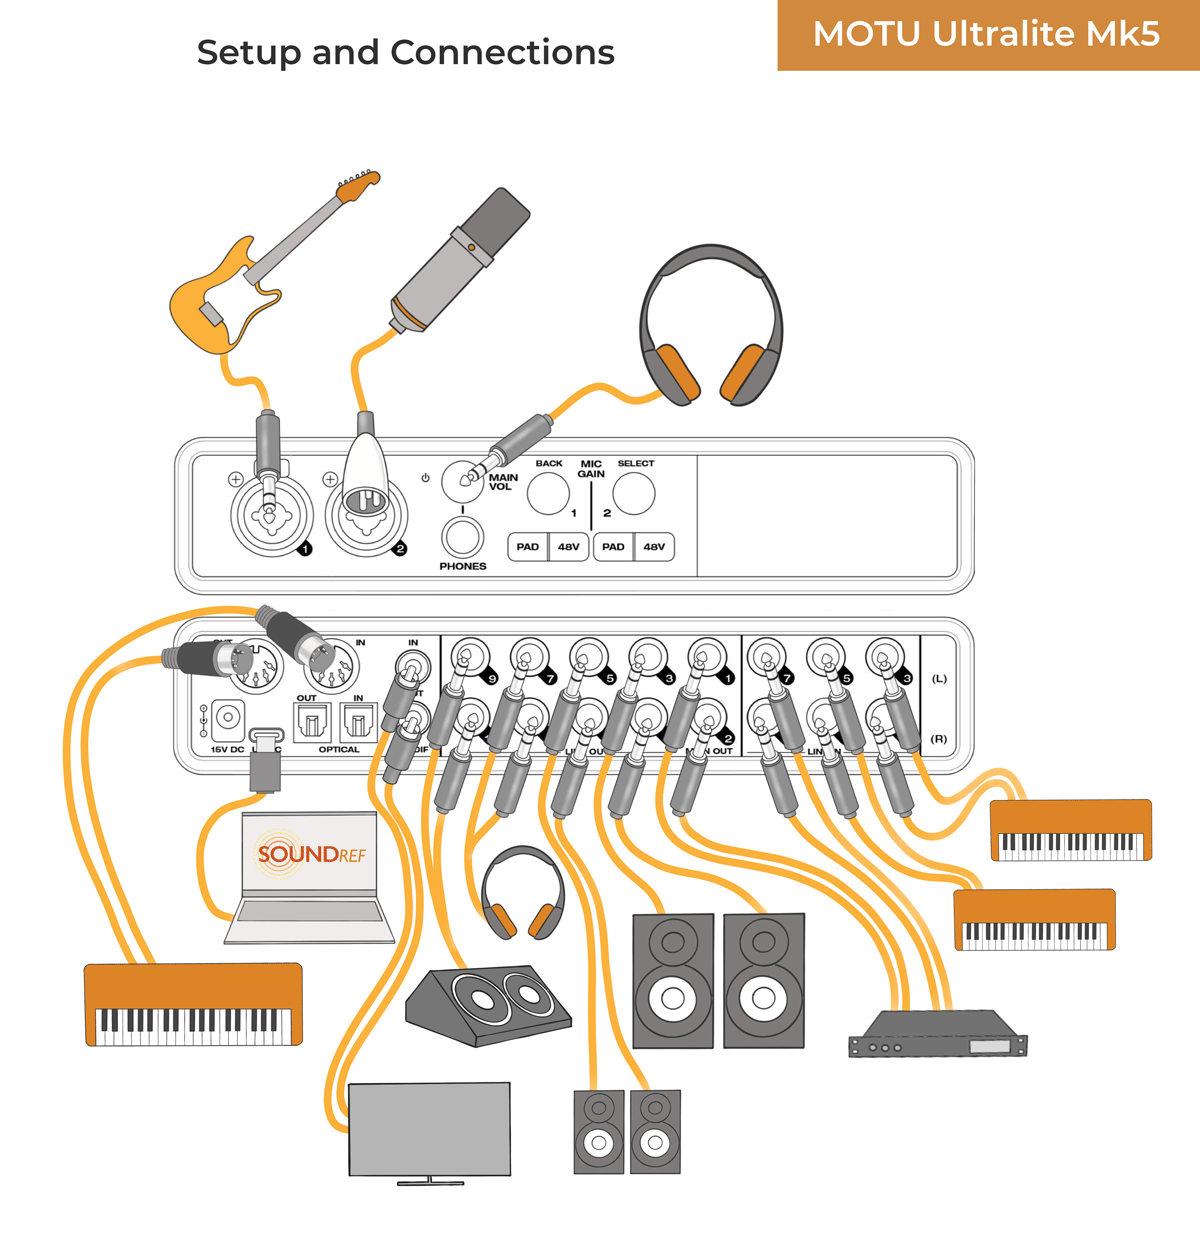
Next to these are two traditional 5 pin midi connectors (in and out), two SPDIF connections (in and out), and two optical RCA connections (in and out), The optical connections can be used in TOSLink mode for 2 extra channels, or as ADAT connectors for a further 8 digital channels.
Further along the back panel are 10 balanced line out TRS 1/4″ sockets. You’ll use 2 of these for your main outputs to the studio monitors, leaving a further 4 stereo outputs to play with – you can use these for a second or third pair of studio monitors, extra headphones or even stage monitors.
Despite cramming so many features into such a compact interface, there were no compromises on sound quality. They feature the renowned ES9026PRO Digital Audio convertors, which MOTU claim to provide a massive 125 dB of dynamic range. Although it doesn’t quite reach that figure in testing, it still does achieve a huge dynamic range.
The preamps are quiet, and any distortion is imperceptible – lower than the noise floor. With around 75 dB of gain, there’s no need for a Cloudlifter or Fethead to raise the signal. The MOTU Ultralite Mk5 delivers excellent sound quality at both input and output stages
You’ll have to use the Cuemix 5 software to access most of the Mk5 controls – it works on windows, Mac and IOS devices. There’s so many features, here including some incredible routing flexibility – you can create individual mixes to specified line outputs, set up loopback and much more.
There’s an effects section, consisting of useable EQ, compression, gate and reverb. They’re virtually real time effects, as latency is so low on these. The general round trip latency on the UltraLite is pretty good too, but of course dependent on the sample rate and buffer size you’re working with.
Need more channels? It’s unlikely you’ll need more input channels on the Ultralite mk5, but if you need to use more than 2 microphones or instruments at the same time, there may be a requirement for more preamps. In this case look at the MOTU 4pre, which gives you four high quality preamps, but without the extended I/O of the ultralite mk5.
Verdict
There’s little to criticise on the Ultralite mk5 – MOTU have provided a huge amount of inputs and outputs, with software which enables some very complex routing should you need it.
And all this while maintaining excellent, transparent sound quality and very quiet preamps with a huge amount of gain and dynamic range. If you don’t mind the external power supply, The MOTU UltraLite Mk5 is a high quality and endlessly versatile audio interface for studio and live use.
6. Solid State Logic SSL2+

Best interface for iconic heritage
At a glance:
| Interface type | USB-C |
| Analogue inputs/outputs | 2/4 |
| Preamps | 2 |
| Digital connections | No |
| Live streaming loopback | Yes (via latest firmware update) |
| Stand alone mode | Yes |
| Dimensions | W x D x H: 234 x 157 x 70mm (9.2 x 6.2 x 2.75″) |
| Weight | 900g (2 lbs) |
The pros:
High quality sound with low noise
2 headphone outputs with separate volume controls
4k mode adds some vintage character
4 extra RCA outputs
The cons:
Headphone sockets at back of unit
Metering could be more detailed
What is it?
A 2 channel input/output USB bus powered audio interface from an established manufacturer, with the option to add the classic SSL vintage sound to your recordings.
Features
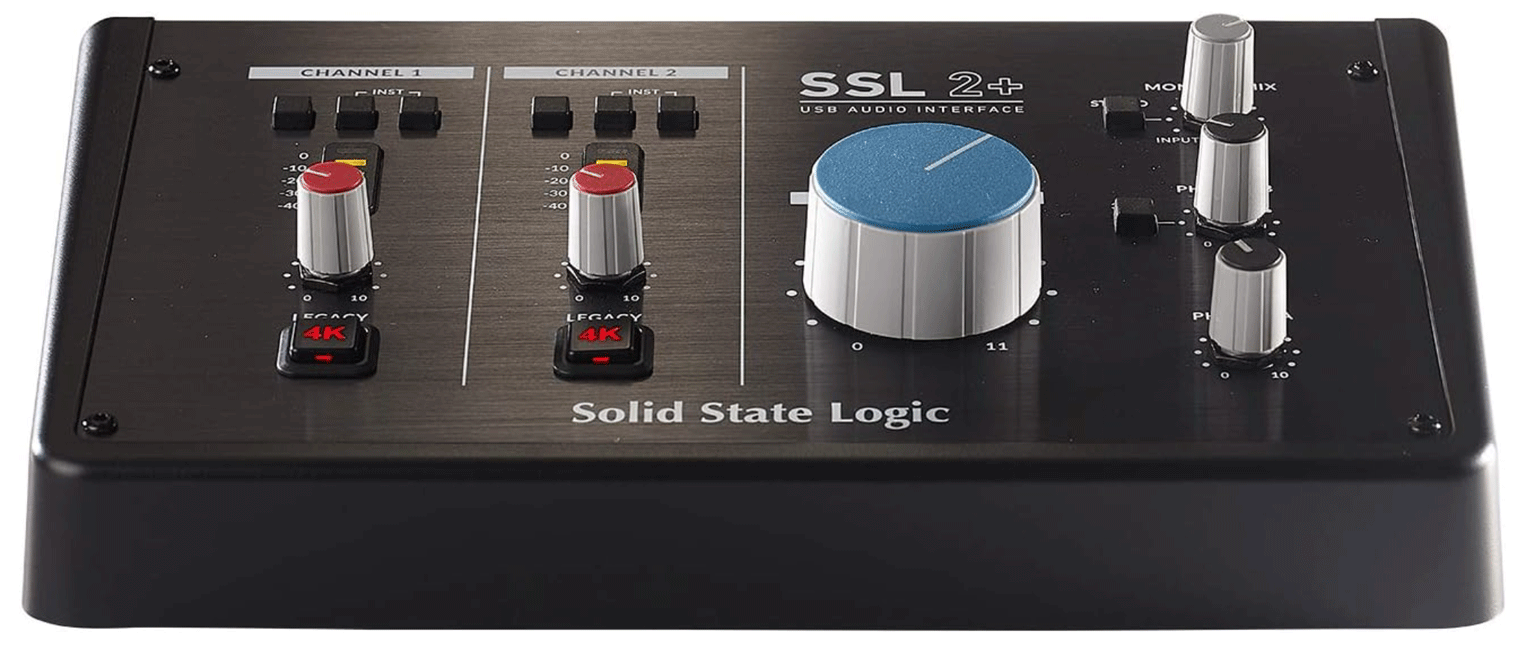
The design of the SSL2+ is simple and functional, similar to a miniature mixing desk, with a metal faceplate and strong plastic housing around the sides. All of the controls are on the top, with all of the attachments at the back. The dials feel solid, with minimal wobble.
On the face, there’s 2 identical channels side by side – one for each input. Each channel includes its own 48v phantom power switch, a line button and an Hi-Z button for instruments. You press the line switch to change from XLR to 1/4″ line level input. Or press both line and Hi-Z button to change from XLR to 1/4″ instrument input.
There’s no indicator to show whether phantom power is on or off, but thankfully, phantom power is automatically disabled when line level or Hi-Z modes are activated. Just be extra careful if you’re planning on using a ribbon mic at some point, as some can be damaged by phantom power.
There’s a 5 stage level meter, displaying 10db increments, which isn’t really enough to fine tune your input levels, but you can do this in your DAW. Under the level meter is a gain dial, and under that, the legacy 4k switch to add that SSL magic to your sound.
Further to the right is an LED indicator to show that the interface is getting power from USB. And next to that is the giant blue monitor level knob, which amusingly goes all the way from 0 to 11.
There are 2 headphone control level dials for headphones A and B, which are connected around the back. You’ll get the same mix from both headphones unless you press the ‘3&4’ button next to headphones B, which will provide an alternative mix from your DAW.
A nice feature, not available on all audio interfaces, is the monitor mix dial, which adjusts volume of the DAW playback with the microphone/instrument signal. Next to that is a ‘stereo’ button which combines both microphone/instrument inputs into a mono signal.
On the back panel is a USB-C port, 2 5 pin midi in and out sockets and two 1/4″ headphone outputs. There are also 2 sets of RCA stereo outputs, which are great if you’re a DJ, as you can send different mixes to each output.
A pair of balanced 1/4″ Neutrik jacks are for connecting to your main studio monitors, and are controlled by the monitor level dial on the front panel. The same dial also controls the output volume of just two of the RCA outputs, so you could use these to connect to an extra pair of studio monitors.
With a mic input gain range of 62dB, and dynamic range of 110.5 dB, there’s a lot of headroom, even when you’re recording with low signal dynamic mics. The preamps are extremely quiet, and I can confirm you won’t need a Cloudlifter or Fethead to raise the signal of a Shure SM7B or SM58.
Engaging the 4k legacy button introduces a surprisingly pleasant sound, with more pronounced upper frequencies, an some subtle harmonic distortion, apparently emulating the sound of Solid State’s 4000 Series equaliser, hence the name 4k.
The headphone output of 10 ohms is perfect for high impedance studio quality headphones. But with lower impedance headphones, there may be some more distortion and colouration of the sound than you’d want to hear. So if you’re doing critical headphone listening for mixing or mastering, make sure to use headphones with impedance of 80 ohms or above.
There’s also the similar model to the SSL+, called the SSL. It’s a very similar interface, using the same preamps. The difference is the SSL is there is just one headphone output, no midi connections, and no RCA connectors.
Need more channels? To extend your recording capabilities to recording 4 mics or instruments at the same time, you’ll need an interface with at least 4 preamps. In this case take a look at the SSL 12, which also comes with extra features, including digital ADAT connectors.
Verdict
The Solid State Logic SSL2+ is a very capable audio interface with high quality sound, quiet preamps, large gain range and individual phantom power settings.
The 4k feature provides a more excited, grittier, subtly distorted sound which adds some lovely character by adding high frequency harmonics.
7. Universal Audio Volt 276

A quality interface for shaping your unique sound
At a glance:
| Interface type | USB-C |
| Analogue inputs/outputs | 2/2 |
| Preamps | 2 |
| Digital connections | No |
| Live streaming loopback | No |
| Stand alone mode | Yes |
| Dimensions | (HxWxD) 102 x 241 x 175mm (4 x 9.5 x 6.9″) |
| Weight | 2.6 lbs (1.2 kg) |
The pros:
Simple to use
Unique sounding compressor
Retro looks
Software bundle included
The cons:
The compressor can add some noise
What is it?
The Universal Audio Volt 276 is a simple 2 in, 2 out desk top audio interface, with no bells and whistles, apart from one very special feature. The 276 has a built in analogue compressor based on their legendary 1176LN Limiting Amplifier.
Features
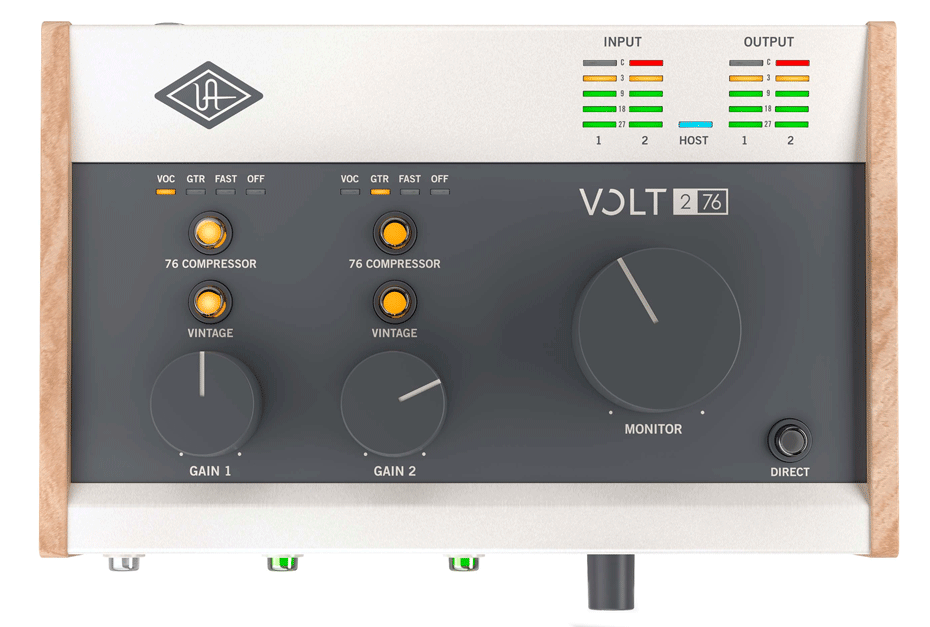
Like many Universal Audio interfaces, the 276 has a gorgeous retro design, with a grey metal casing, and two real wood panels on either side. The sturdy dials and chunky LED buttons are on the top. There’s a big knob on the left for the main volume, and two smaller knobs for controlling the gain of the channels. There’s also two chunky yellow buttons per channel to activate the vintage mode and the compressor.
There’s some dinky 5 stage level meters in the top right hand corner, which are just about enough to set your gain, but certainly an improvement over the 2 LEDs on the Volt 2.
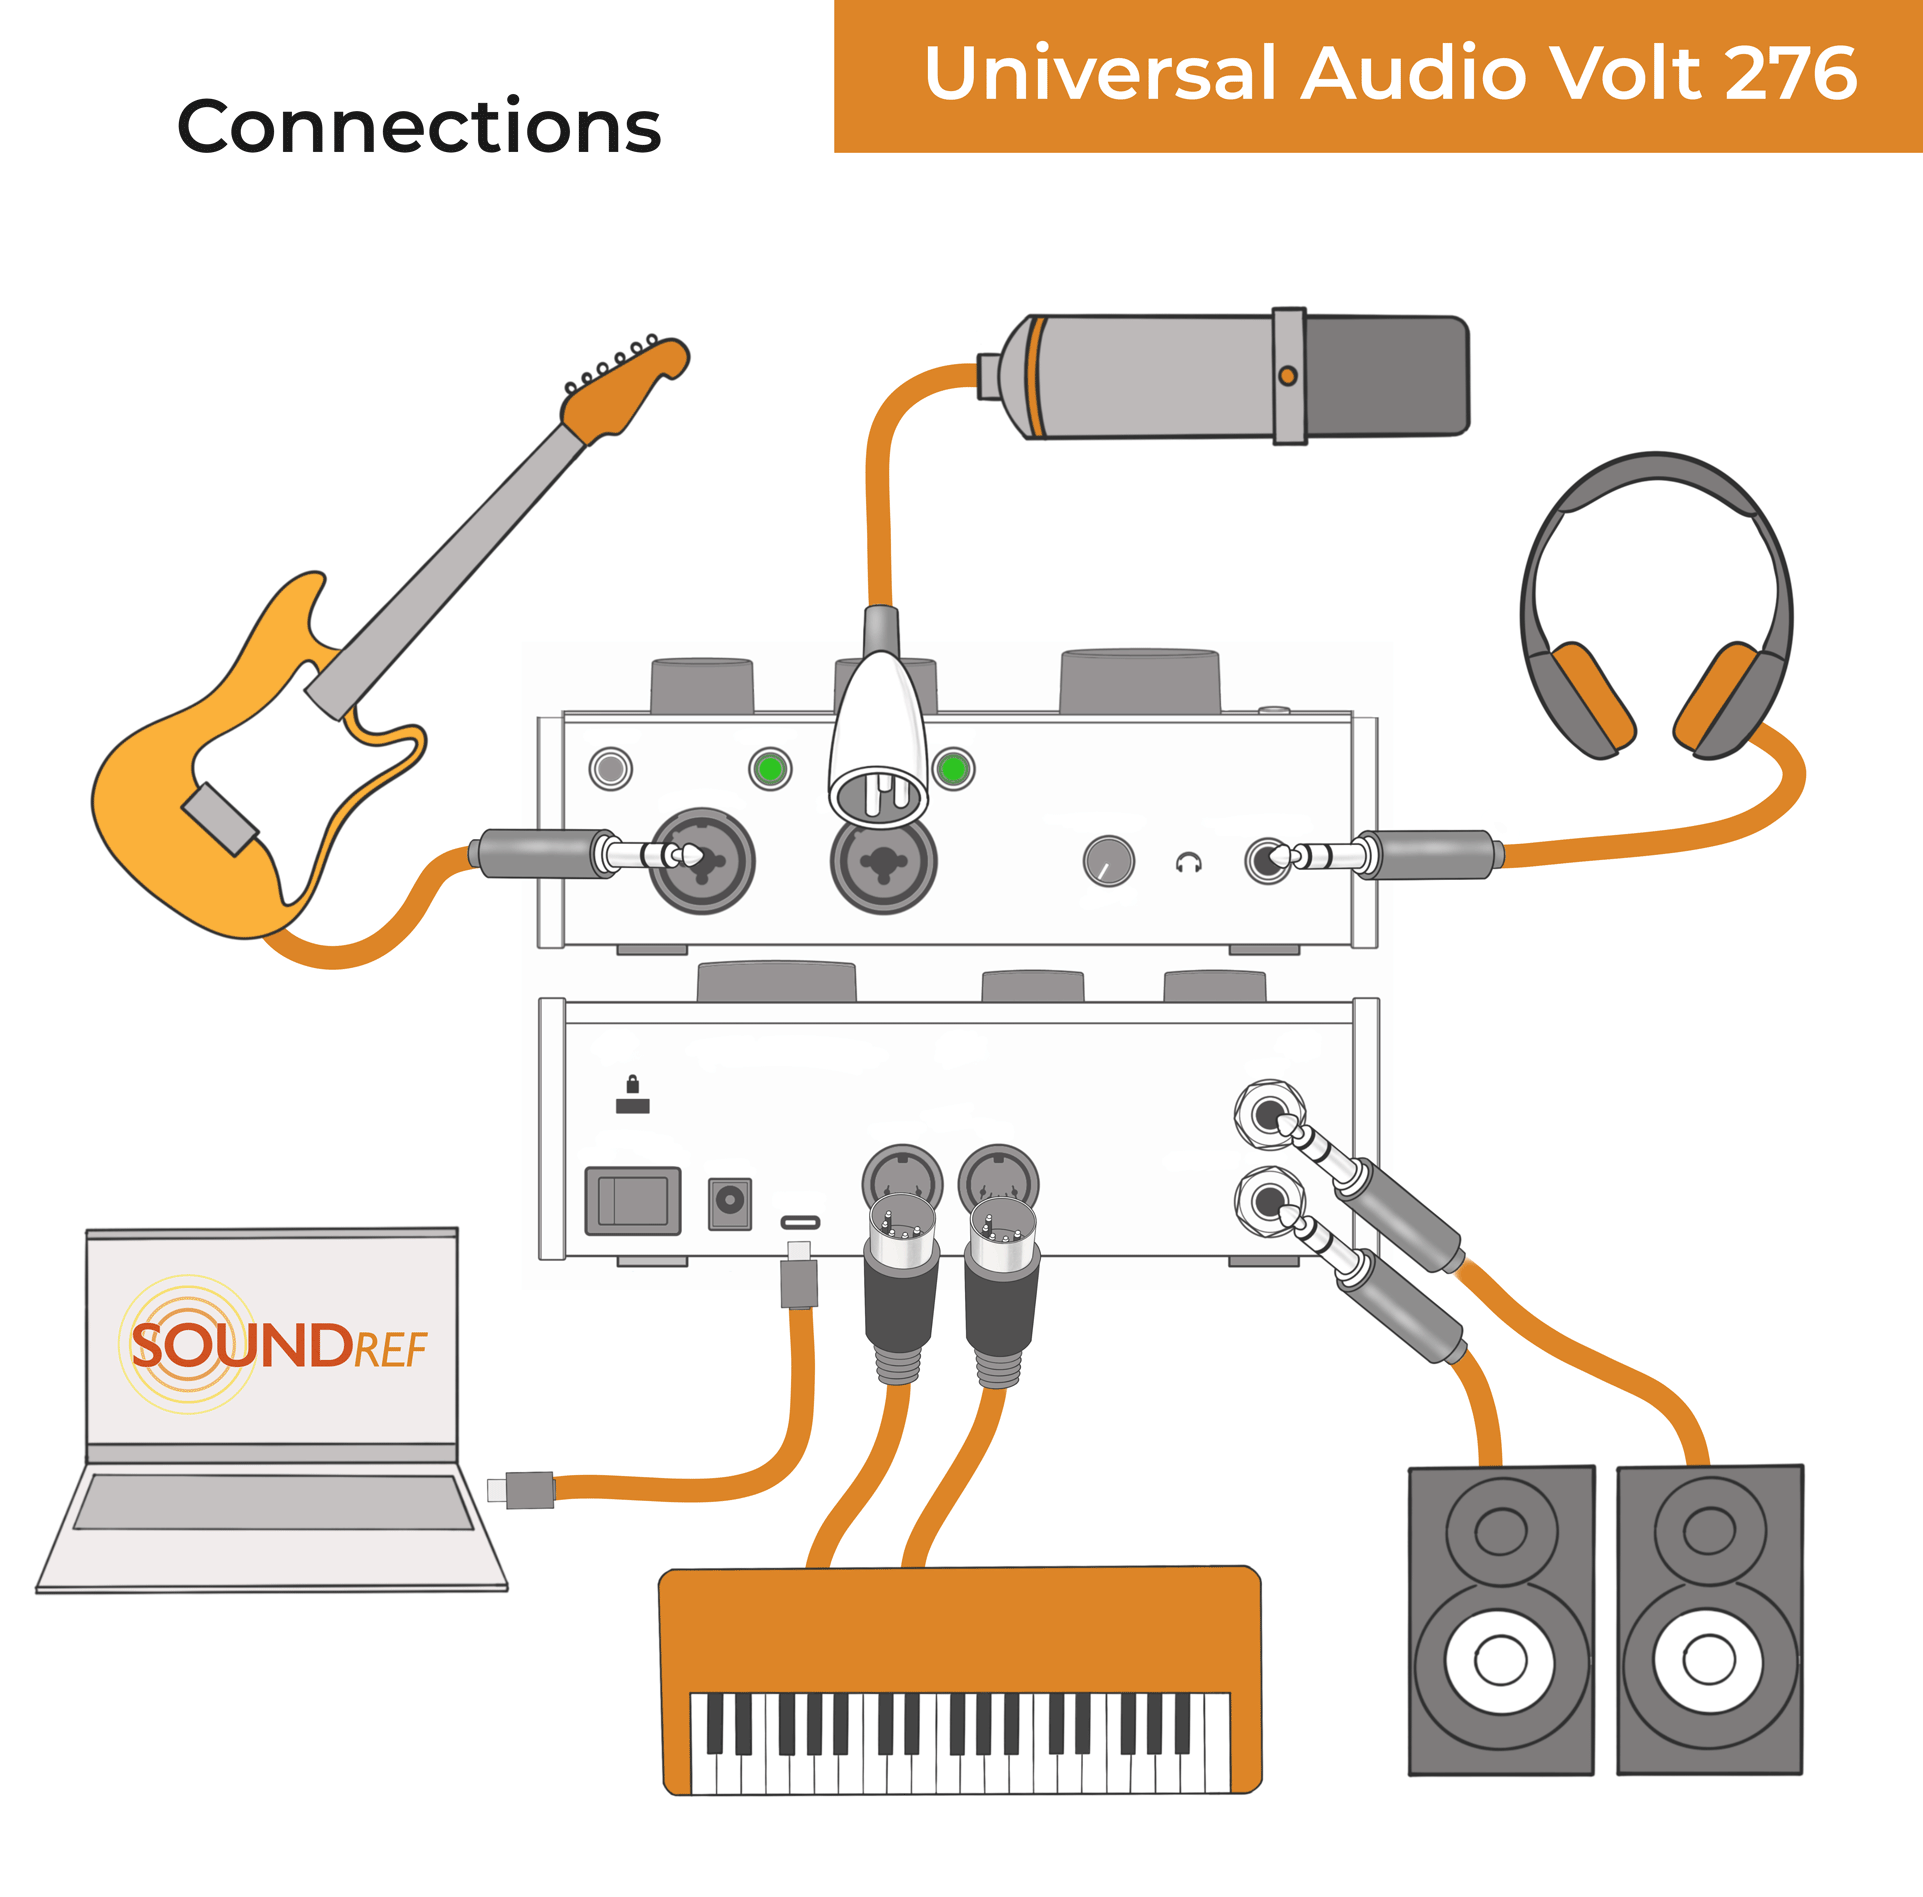
On the front panel are two XLR/TRS combo inputs, and a switch for toggling between between line level and instrument level. There’s also a phantom power button which operates for both channels at the same time. Next to these is a 1/4″ headphone jack with volume control.
On the back of the Volt 276 is an on/off switch, and a DC power socket for the rare situation your computer or USB device isn’t capable of delivering sufficient power, if you want to make music with your iPad or iPhone. There’s also two 5 pin midi sockets, and two balanced TRS outputs to power your studio monitors.
The mic input has a healthy 112 dBa dynamic range, and if there was any distortion, it was imperceptible to my ears. The Volt 276 also has a very low noise floor, and I can confirm you won’t need a Cloudlifter or Fethead to raise the signal of dynamic mics.
The vintage mode allows you to record audio with the rich sound of a classic tube preamp, boosting the treble and adding a subtle touch of distortion. While the 76 compressor can instantly enhance any audio signal, adding punch and clarity.
The compressor also works as a limiter and is really simple to use, with three preset settings – VOC (vocals), GTR (guitar), and FAST. They adjust the attack and release time for you automatically, so you don’t have to work out how to use a compressor – simply let your ears to tell you when it’s sounding right.
I found that you could achieve a classic analogue tube-like warmth by backing off the gain, or push into a stronger overdrive to experiment with shaping the sound. The compressor does limit the dynamic range, so there’s the possibility of introducing more noise into your signal when you use the effect too heavily.
Need more channels? Look at the Audio Universal 476 which has 4 XLR combo inputs, 2 main outputs and an additional 4 line outputs.
Verdict
The Audio Volt 276 is a beautifully built and designed piece of hardware, with solid dials and tons of charm. I love the 276 for it’s low distortion and quiet preamps when you need them, but also it’s capability for warm, vintage-inspired sound at the push of a button whenever your music calls for it.

Audio Interface Buying Guide
I’ve made a guide to help you choose the best audio interface for your needs. Depending on your computer and your needs as a creator, you’ll have to consider the following:
- What is an audio interface?
- Connecting an interface to the computer
- How many inputs and outputs?
- What are analogue digital convertors?
- Quality of the pre amps
- What sort of inputs do you need?
- Midi sockets
- Loopback feature
- Special features
- Audio Interface Software
What is an audio interface?
The audio interface is the bridge between the digital sounds within your computer’s recording environment, and the outside world.
Every time you hear what’s coming from your computer, the sound is going through a conversion process. Something, is converting it from digital to analogue.
Likewise, when you record something into a mic, it goes through a conversion process – from analogue to digital. Once digital, it can enter the computer’s recording environment for adding effects, mixing and so on.
Normally your computer’s sound card handles all the analogue and digital conversions. But if you need professional sounding recordings, you’ll need to use an independent audio interface.
Connections on the audio interface
Most audio interfaces connect in 3 different ways, though some have more than one option, giving you more choice if you decide to upgrade your computer down the line.
- USB
You’ll find these on the cheaper interfaces as they have the slowest transfer rate.
- Firewire
These aren’t seen much these days, but hey offer a good transfer rate.
- Thunderbolt
This is a great choice if you can afford it, and if your computer has Thunderbolt connections. It’s potentially faster than both USB and Firewire.
How many inputs and outputs do you need?
Every audio interface has a number of input and output sockets.
Let’s start with the outputs. You’ll probably only need two of these, to connect to your left and right studio monitors. Having four can also be handy if you have another set of monitors to feed, but not crucial.
Inputs are where sound enters the audio interface. If it’s just you recording, you’ll probably only need 2 inputs. With 2 inputs you can record vocals, or a stereo guitar.
But if you wanted to record a stereo guitar, vocals and a stomp box, all at the same time, you’ll need 4 inputs.
Or if you wanted to record a live band, with drum kit, you’ll need at least 16 inputs. It’s probably better to book a commercial studio for this, as they’ll have an acoustically treated live room, and a selection of good mics.
Suitable preamps for an audio interface
When you consider how many inputs you require, you should also consider which of these inputs have pre amps. A pre amp is used with a microphone, to boost the signal. If you’ll be recording 2 mics simultaneously, you’ll need 2 pre amps as well as 2 inputs.
You’ll hear about ‘gain range’, which is the amount of dB (volume) the audio interface is capable of amplifying the audio signal. But watch out for figures on paper – sometimes at the higher end of the gain range, the sound can become too distorted and/or noisy to use.
Some engineers prefer to use separate dedicated preamps to ensure that optimum sound. But it probably wouldn’t be necessary with most quality audio interfaces unless you’re using a ribbon mic, which needs a lot of amplification.
If you’re planning to use a dynamic mic, rather than a condenser, make sure that the audio interface you choose had enough gain to give you a clear, strong signal. Dynamic mics are simple mics, which need more amplificagtion than condensers, and can potentially introduce noise into the recording as you crank up the gain.
A way around this is by using a Cloudlifter or Fethead – a small device which links between the mic and the interface, raising the gain.
The preamp will determine the quality of the signal as it reaches your computer. But its not the only influence on sound quality – there’s also the subject of analogue digital conversion.
Analogue Digital convertors
When recording an external signal into the audio interface, the sound will be converted from analogue to digital. Once digital, it can be processed inside the computer, before being sent out to the speakers, where the signal will be converted from digital to analogue.
The quality of the convertors make an enormous difference to the sound quality. The sound card in a computer has digital to analogue (DA), and analogue to digital (AD) convertors, but they are of varying quality, non coming anywhere near the quality of an audio interface.
You’ll hear about ‘dynamic range’ – this is the difference between the loudest signal the interface can handle, compared to its lowest sound, which will be the existing noise floor. A high dynamic range leaves you with more headroom while you’re recording, and makes for less noisy recordings.
The different types of inputs on an audio interface
While choosing an interface, pay attention to the types of inputs it has. You’ll find a combination of mic, line and optical:
– Mic
These are for plugging microphones directly into. Microphones have a low signal which will be boosted with a preamp. They should also have the option of switching on ‘phantom power’ when using condenser mics.
-Line
These are for higher level signals, like keyboards, an mp3 player or the output of an external preamp.
–Optical
Some of the more expensive audio interfaces have digital connections, such as Toslink, ADAT and SPDIF, which allow you to expand the number of inputs and outputs available to you.
Midi sockets
If you’re planning to use very old keyboards with your recording setup, and need to control them via midi, consider looking for an audio interface which has the old style 5 pin connector sockets, such as the RME Babyface Pro FS.
Newer midi keyboards are accessed via USB, so there’ll be no need for the traditional 5 pin midi socket.
Loopback feature
This is an invaluable feature to have on you audio interface if you’re planning any sort of live streaming. It allows you to route the sound from your computer or DAW back into the interface, so you can add and combine more sounds from your mics or instruments.
It used to be a complex task to set up, but many interfaces now make loopback very simple to achieve.
Special features
Every audio interface has its own special features. Work out whether these are features you’ll actually need, or if you could spend your money on more useful features.
For instance, the 4th generation Focusrite Scarlett 2i2 and 4i4 have the option of colouring the sound to emulate their classic ISA pre amp. It’s a trend on many of the budget audio interfaces, with Universal Audio Volt emulating their Universal Audio 610 preamp, and SSL and Neve doing the same.
Audio Interface Software
Audio interfaces normally come with their own software, which can range from the bare bones ‘Studio 2’ software from Focusrite, to more sophisticated offerings from the Babyface Pro FS and Universal Audio Apollo Twin X, which allow some really complex routing.
You’ll also see software bundles with many audio interfaces designed to get you started with recording straight away. For instance the Focusrite Scarlett models come with their ‘hitmaker’ expansion pack, including Ableton Live Lite and Pro Tools Artist, and a selection of useful plugins.
Conclusion
Once you’ve chosen a computer and some DAW software to go with it, the Audio Interface is the next addition to your audio gear. If you’re a solo musician, stick to something simple, like a 2 input, 2 outout. But if you’re planning on recording several sound sources simultaneously, look at an audio interface with more inputs and preamps.
Every interface has its pro and cons, so you’ll need to work out what you require for your recordings, and think about what you might need in a few years time, to save you from having to keep upgrading.
