The Definitive JBL 305P MkII Review
Advanced JBL sound technology is now available in a compact package for the home studio

Reviewed by: Paul Narang
Review date: July 2022
Current price: Around $300

JBL 305P MkII Review
| Pros | Cons |
| Detailed and clear sound Accurate stereo imaging. Budget price EQ settings | None at the price |
Studio Monitors – JBL 305P MkII Review
The JBL Pro MkII Monitors are some of the most affordable 5” studio monitors available. Drawing on the professional JBL heritage, they deliver a clear detailed sound with accurate stereo imaging.
What are they?
JBL, was founded in 1946 by the innovative American engineer, James Bullough Lansing. JBL become a household brand by the 1970s, and by 1977, more recording studios were using JBL monitors than all other brands combined.
In 2013, they released the JBL 305 LSR MkI, which incorporated technologies derived from their legendary M2 Master Reference Monitors.

The JBL 305P MkII is the 2019 update of the MkI, with an MDF enclosure, the addition of a boundary Eq setting and improved transducers. The improvements were mostly aesthetic, and had minimal impact on the sound quality.
More importantly the new JBL 305P MkII still uses JBL’s patented Image Control Waveguide, which add to the sonic detail and the monitor’s broad sweet spot. But does it match up to JBL’s premium monitor range?
In the box
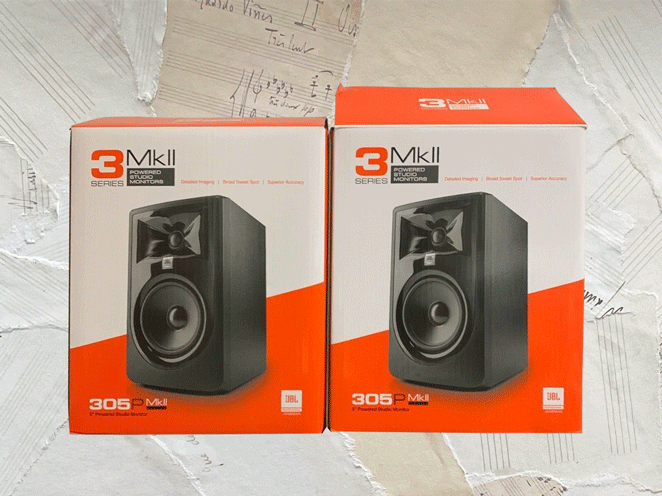
The JBL 305P MkII studio monitors are sold singly, not as a pair. Each one arrived in a smart red and white box, with printed info about the ‘revolutionary image control waveguide’. There’s no included audio cables, which is standard practice for professional studio monitors.
Also included:
- One power cord
- Quick setup guide
- Four peel-off rubber pads
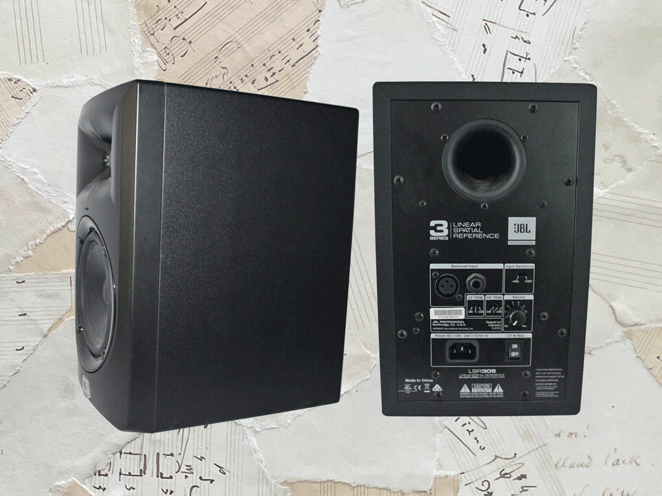
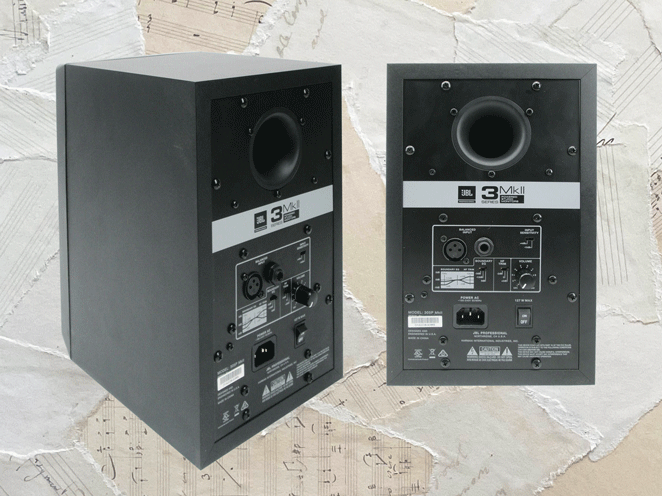
Connectivity
- XLR and 1/4″ TRS inputs
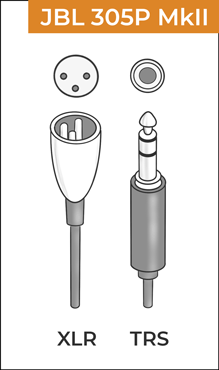
Just like the JBL 305 LSR MkI monitors, the MkII’s have a fully professional XLR and 1/4″ TRS balanced connectors.
This gives you the choice of using either:
- XLR cables (balanced)
- TRS 1/4″ cables (balanced)
- TS 1/4″ cables (unbalanced)
Using XLR cables
XLR inputs are only found on professional studio equipment. They’re balanced, which means the cables are shielded from interference and will carry a higher signal than unbalanced cables.
1/4″ TRS vs TS cables
If you’re using 1/4″ cables, you’ll need two TRS 1/4″ cables. These are different from the very similar looking TS 1/4″ cables, though both will actually work.
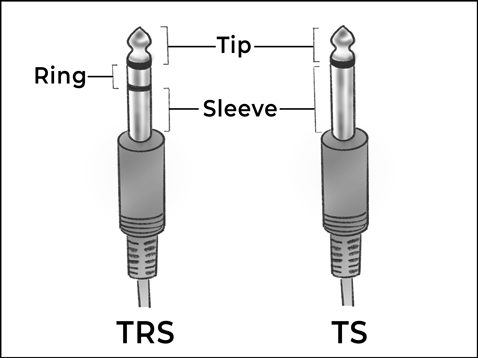
The way to tell them apart is by looking at the connectors. TRS connectors have 2 black lines, but TS connectors have just one.
The advantages of using the proper TRS cables is that they will work like XLR cables – the signal will be shielded, and less likely to pick up noisy interference. The signal will also be considerably louder in volume and of superior sound quality.
Controls on the JBL 305P MkII Monitors
On the back of each monitor is a detented volume control, moving in steps between 0 and 10, and an on/off switch
Sensitivity switch
There’s also a -10dBV/+4dBu input sensitivity switch. This can be set to +4dBu when connecting to professional equipment and sources with high output levels. If you’re connecting consumer-grade audio equipment, set the switch to -10dBV.
There’s 2 EQ switches:
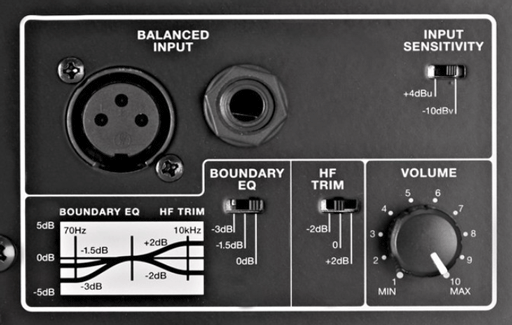
EQ Controls
- Boundary (0dB, -1.5dB, -3dB)
- HF (-2dB, 0dB, +2dB)
The boundary setting is a low frequency shelf, replacing the Low Frequency setting of the MkI monitor. With this setting, the bass can be rolled off at 50Hz to compensate for the monitor being in close proximity to walls.
The High Frequency setting remains from the MkI edition, and allows an adjustment of 2 decibels, either way, in the high end frequencies, around 10 kHz.
These EQ controls work in a similar way to bass and treble controls on a hi-fi system. They’re a welcome addition to the monitor, and enable some fine tuning to compensate for minor acoustic problems.
Construction and materials
Like the flagship JBL M2 reference monitors, the 305P MkII monitors are surrounded with 15mm thick MDF enclosures. MDF (medium density fibreboard) is a dense material consisting of wood fibres in resin, and adds to the robust build quality.
Covering the inside of the enclosure is a layer of foam to help dampen the sound, and limit vibrations reaching the case .
There’s a plastic baffle, which would perhaps be more effective in a heavier material. And there’s a double flared (flared at both ends) reflex tube leading from behind the tweeter to the port at the back of the enclosure.
The front panel is made from plastic, which is necessary for the detailed shaping of the Image Control Waveguide around the tweeter.
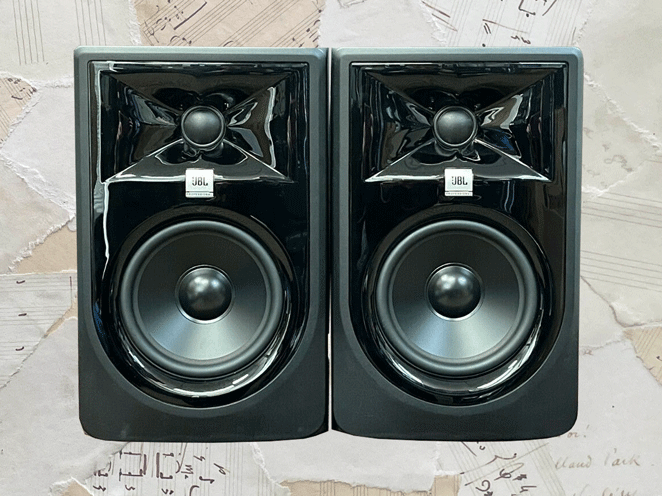
Neither of the drivers are protected with grilles, which is no problem if you’re not planning to carry these around with you.
Woofers and tweeters
The JBL 305P MkII monitor employs a 1″ soft-dome, neodymium-powered tweeter, and a 5 inch ‘long throw’ woofer cone.
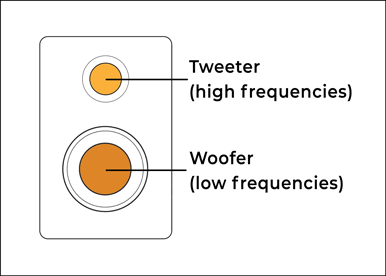
The 5″ woofer size is often considered the optimum size for a small room. It’s a compromise between having enough bass to play back music accurately, and having too much bass, which causes problems in small rooms.

Two amplifiers
The JBL 305P is powered by a pair of 41W Class-D amplifiers, one each for the tweeter and the woofer. And each of those amps are fed by an active crossover.
A crossover divides the frequencies that pass through it into high and low. And an active crossover is a device that splits the signal before the amplifier, rather than after. In theory, this can help fine tune the crossover frequency.
Isolation pads
On the base of the monitor are the small supplied rubber pads, which help to minimise low end frequency transmission into the speaker stand or desktop.
I recommend buying a pair of tilting isolation pads with your JBL monitors. They’re much thicker than the supplied pads and will make a significant difference to the bass frequencies. You should hear an improvement in tightness and clarity.
Height and weight
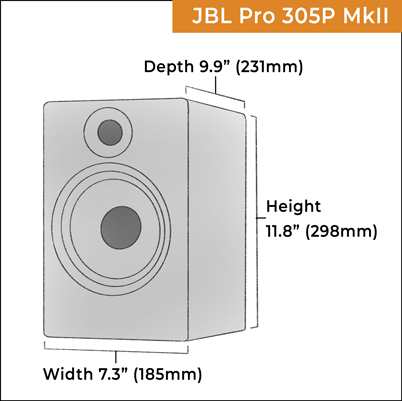
Each JBL 305P MkII monitor stands at a height of 298mm (11.8″), with a width of 185mm (7.3″) and depth of 231mm (9.9″).
They weigh 4.73 kg (10.43 lb) each.
Frequency response
When all the frequencies are balanced with each other, we have what’s called a flat frequency response. It will range from the lowest frequency to the highest frequency outputing from the speaker.
It’s common for manufacturers to quote more than one frequency response range for their monitors, which can be confusing when trying to compare them.
A common measurement is at ±3 dB. This means there’s a 6 dB variation between the highest and lowest of the quoted frequencies. So that’s quite flat. There’s also ±6 dB, which isn’t quite so flat, but not bad.
Another measurement is at -10 dB. This is where the sound drops off at either end of the audio spectrum. It means you might just about hear these frequencies.
JBL quotes a frequency response of 49 Hz – 20 kHz (±3 dB) for the 305P MkII. So between these frequencies, it’s quite flat
They also quote a frequency response of 43 Hz to 24 Hz (-10dB).
So there’s also traces of bass down to 43 Hz, and quiet higher frequencies up to 24 kHz. This adds to the overall fullness of sound.
The double flared reflex tube utilises JBLs ‘Slipstream Technology’, which helps minimise turbulence inside the port. This in turn helps with precise bass reproduction by minimising chuffing. Chuffing is the wooshing noise which occurs when the music is loud, and the air is moving too fast.
The port is also precisely tuned to help optimise the sound quality, and accuracy of the bass.
JBLs Image Control Waveguide
Waveguides work a bit like the horns of old gramophones, shaping the sound as it leaves the speaker. It helps with sound dispersion, aligning the tweeter and woofer to minimise phase issues. I’m sure it plays a substantial part in the extra wide sweet spot apparent on these monitors.
Design and styling
The JBL 305P MkII monitors look like traditional bookshelf speakers than studio monitors. They’re traditionally constructed in MDF, and pulling back the protective film on the front, reveal a shiny plastic panel. It may not be to everyones tastes, but looks smart and strong.
I found the plastic covering rather prone to collecting fingerprints while handling, so I suggest giving them a quick polish before putting them in place.
They look great in white too.
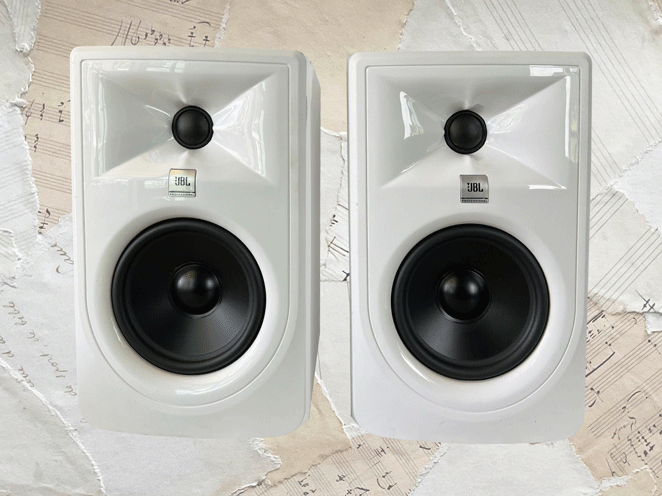
They’re deeper than they are wide, and feel substantial and solid at just under 5 kg each. The MkIIs have the addition of the JBL Pro badge under the tweeter, which add to the classy look. A white LED illuminates when the monitors are switched on.
Placing JBL 305P MkII monitors in the room
The JBL 305Ps should ideally be placed on speaker stands, either side of your work desk. Turn each one slightly inwards so they’re both pointing towards your ears.
As near fields, they’re designed to sound optimal for close up listening. They should form an equilateral triangle, with each speaker and your head in one of the corners. This is called the sweet spot, where the sound will be most accurate.
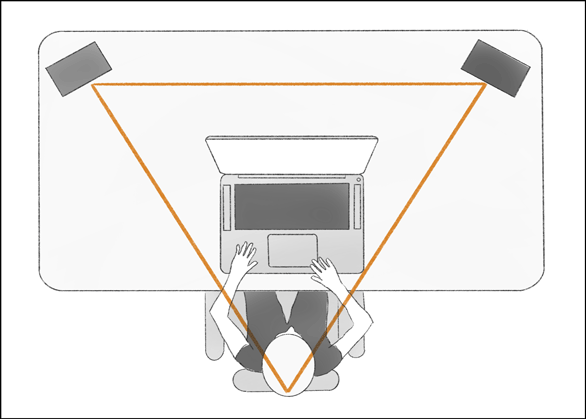
Ideally, the tweeters should be inline with your ears while you’re in your listening position. Keep them in the vertical orientation, with the tweeter on top.
For the best acoustic experience, place your desk symmetrically, midway along the wall. This will ensure that both monitors have a similar acoustic environment.
Because the JBL 305P MkII monitors are rear ported, they should be placed away from walls. This gives some space for the air released from the reflex port, and avoids a muddy sounding bass.
Once your monitors are in place, you can experiment with the equalisation controls on the back, to get an accurate sound.
Placing JBL 305P MkII monitors on a desk
Although not acoustically ideal, the JBL’s can be placed on a desk, on either side of a computer monitor or laptop. Bear in mind that every reflection from the desk and equipment while add extra colours to the mix, and distort the clarity of the sound image.
You could put them on desk stands, to raise them up and avoid sound coloration.

Performance
There was no need to ‘run in’ the JBL 305P MkII monitors, as JBL have already done this to every pair before they leave the factory. They’re played at full volume for 100 hours to check for faults.
How the JBL 305P Monitors sound
The sound is focused, with a clearly audible and solid bass. The size of the speaker doesn’t allow for the deepest studio rattling bass, but what was there was tight and clear.
The stereo imaging was very good, with a three dimensional feel to the sound. The sweet spot was wider than I would have expected for a studio monitor of this size and price point.
In fact, for the price, the sound was surprisingly detailed across the frequency range. The high and low frequencies had a pleasing balance, which I could enjoy working with for long hours at a stretch.
Some users have reported a hiss coming from these speakers, even with nothing plugged in. I can report that the review models had just a barely audible hiss with ear to the tweeter. Certainly nothing I would have noticed myself during nearfield monitoring.
For the best gain structure, I suggest keeping the volume on the monitor as low as you can, while maximising the input level.
Using the Eq controls
While listening to the JBL 305P monitors on stands, I didn’t need to make any EQ adjustments at the back of the speakers. The sound has a slight brightness which you could reduce with the HF switch. But I think it’s just the natural sound of the speaker which sounded smooth and balanced to me with no EQ adjustments.
With the JBL 305P MkII monitors on the desktop, the boundary switch enabled me to cut 1.5 dB from the lower frequencies, which helped tighten up the bass.
Need more bass?
The JBL 305P MkII monitors are the smallest in the JBL 3000 series. If at some point you need to be able to hear more low end bass frequencies, you can add a matching subwoofer, such as the JBL LSR310S Powered Studio Subwoofer.
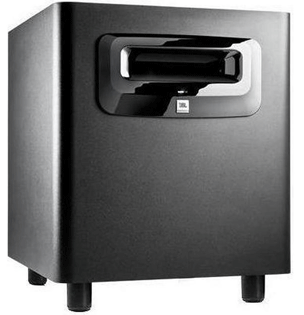
The subwoofer connects to the 305P via XLR cables, and will crossover at 80Hz.
This will extend the frequency range down to an impressive 27Hz – that’s A0 on a piano.
If you don’t need that level of bass, you could also look at the next size up in the JBL 3000 range, the JBL 306 monitors, with a 6.5″ woofer. This would extend the frequency range down to 39 Hz.

Verdict: The best small monitors?
The JBL 305P MkII monitors are priced as entry level studio monitors, but have some impressive features borrowed from their elite monitors costing considerably more.
The advanced Image Control Waveguide combined with the specially shaped and tuned rear reflex port result in a clear and detailed sound. The sweet spot is wider than other similar monitors, and the bass is present without being too overpowering.
The JBL 305P MkII monitors are perfect for anyone looking to purchase their first pair of studio monitors. With the contained bass response, the 305Ps are best suited for use in a small or less than acoustically optimised room.
JBL 305P MkII vs Yamaha HS5
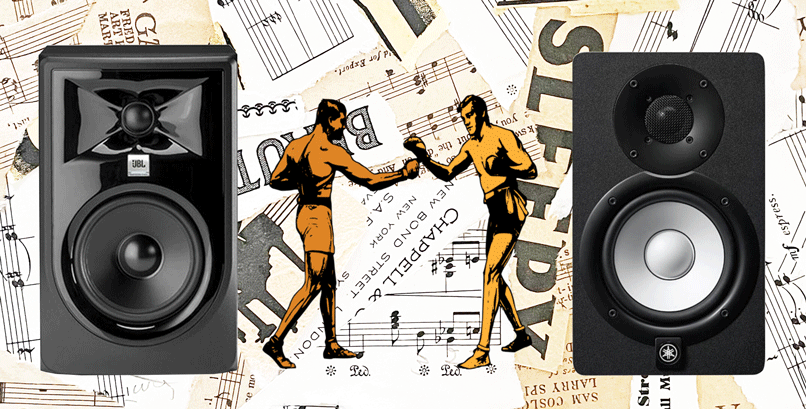
Another 5″ powered studio monitor worth considering is the Yamaha HS5. But how does it compare to the JBL 305P MkII?
They both have professional XLR and 1/4″ TRS connections, and both the Yamaha and JBL have bass and treble controls to tailor the speaker output to the listening environment.
The Yamaha is known for its revealing midrange, but the bass is slightly limited, not quite reaching the depths of the JBL. But it does excel in the higher bass and low midrange frequencies.
So if you need to hear a good amount of bass, the JBL is your best choice. But if you need to limit the bass because of the size of your room, or lack of acoustic treatment, the Yamaha HS5 will provide a high level of detail and fantastic transient response.
Standing just below the JBL 305 in height, the Yamaha HS5 monitor is the more expensive of the two. It’s also available in black, white and space grey.
Summary
The JBL 305P MkII studio monitors are very capable speakers, and are well suited for the producers and musicians embarking on their recording journeys.